ASTM G196-08(2021)
(Test Method)Standard Test Method for Galling Resistance of Material Couples
Standard Test Method for Galling Resistance of Material Couples
SIGNIFICANCE AND USE
5.1 This test method is designed to rank material couples in their resistance to the failure mode caused by galling and not merely to classify the surface appearance of sliding surfaces.
5.2 This test method has been shown to have higher repeatability than Test Method G98 in determining the galling resistance. Test Method G98 can be used for initial ranking of galling resistance.
5.3 This test method should be considered when damaged (galled) surfaces render components non-serviceable. Experience has shown that galling is most prevalent in sliding systems that are slow moving and operate intermittently. The galling and seizure of threaded components is a classic example that this test method most closely simulates.
5.4 Other galling-prone examples include: sealing surfaces of valves that may leak excessively due to galling and pump wear rings that may function ineffectively due to galling.
5.5 If the equipment continues to operate satisfactorily and loses dimension gradually, then galling is not present, and the wear should be evaluated by a different test method.
5.6 This test method should not be used for quantitative or final design purposes, since many environmental factors influence the galling performance of materials in service. Lubrication, alignment, stiffness, and geometry are only some of the factors that can affect how materials perform. This test method has proven valuable in screening materials for prototypical testing that more closely simulates actual service conditions.
SCOPE
1.1 This test method covers a laboratory test that ranks the galling resistance of material couples using a quantitative measure. Bare metals, alloys, nonmetallic materials, coatings, and surface modified materials may be evaluated by this test method.
1.2 This test method is not designed for evaluating the galling resistance of material couples sliding under lubricated conditions, because galling usually will not occur under lubricated sliding conditions using this test method.
1.3 The values stated in SI units are to be regarded as standard. No other units of measurement are included in this standard.
1.4 This standard does not purport to address all of the safety concerns, if any, associated with its use. It is the responsibility of the user of this standard to establish appropriate safety, health, and environmental practices and determine the applicability of regulatory limitations prior to use.
1.5 This international standard was developed in accordance with internationally recognized principles on standardization established in the Decision on Principles for the Development of International Standards, Guides and Recommendations issued by the World Trade Organization Technical Barriers to Trade (TBT) Committee.
General Information
Relations
Standards Content (Sample)
This international standard was developed in accordance with internationally recognized principles on standardization established in the Decision on Principles for the
Development of International Standards, Guides and Recommendations issued by the World Trade Organization Technical Barriers to Trade (TBT) Committee.
Designation: G196 − 08 (Reapproved 2021)
Standard Test Method for
Galling Resistance of Material Couples
This standard is issued under the fixed designation G196; the number immediately following the designation indicates the year of
original adoption or, in the case of revision, the year of last revision. A number in parentheses indicates the year of last reapproval. A
superscript epsilon (´) indicates an editorial change since the last revision or reapproval.
1. Scope 3.2 Definitions:
3.2.1 apparent area of contact—areaofcontactbetweentwo
1.1 This test method covers a laboratory test that ranks the
solid surfaces defined by the boundaries of their macroscopic
galling resistance of material couples using a quantitative
interface.
measure. Bare metals, alloys, nonmetallic materials, coatings,
3.2.2 galling—form of surface damage arising between
and surface modified materials may be evaluated by this test
sliding solids, distinguished by macroscopic, usually localized,
method.
roughening and creation of protrusions above the original
1.2 This test method is not designed for evaluating the
surface; it often includes plastic flow or material transfer, or
galling resistance of material couples sliding under lubricated
both.
conditions, because galling usually will not occur under
3.2.3 triboelement—one of two or more solid bodies that
lubricated sliding conditions using this test method.
comprise a sliding, rolling, or abrasive contact, or a body
1.3 The values stated in SI units are to be regarded as
subjected to impingement or cavitation. (Each triboelement
standard. No other units of measurement are included in this
contains one or more tribosurfaces.)
standard.
3.2.4 tribosurfaces—any surface (of a solid body) that is in
1.4 This standard does not purport to address all of the
moving contact with another surface or is subjected to im-
safety concerns, if any, associated with its use. It is the
pingement or cavitation.
responsibility of the user of this standard to establish appro-
3.2.5 tribosystem—any system that contains one or more
priate safety, health, and environmental practices and deter-
triboelements, including all mechanical, chemical, and envi-
mine the applicability of regulatory limitations prior to use.
ronmental factors relevant to the tribological behavior. (See
1.5 This international standard was developed in accor-
also triboelement.)
dance with internationally recognized principles on standard-
ization established in the Decision on Principles for the
3.3 Definitions of Terms Specific to This Standard:
Development of International Standards, Guides and Recom-
3.3.1 galling —stress at which the probability of galling
mendations issued by the World Trade Organization Technical
occurring on one or both of the test specimens is 50%.
Barriers to Trade (TBT) Committee.
4. Summary of Test Method
2. Referenced Documents
4.1 This test method uses available laboratory equipment
2.1 ASTM Standards:
capable of maintaining a constant, compressive load between
G40 Terminology Relating to Wear and Erosion two flat specimens, such as hydraulic compression testing
G98 Test Method for Galling Resistance of Materials
machines. One specimen is slowly rotated one complete
revolution relative to the other specimen. The surfaces are
3. Terminology
examined for galling after sliding. The criterion for whether
galling occurs is the appearance of the specimens based on
3.1 Definitions used in this test method are given in Termi-
unassisted visual examination.
nology G40.
4.2 Appropriate load intervals are chosen to determine the
threshold galling stress within an acceptable range.
This test method is under the jurisdiction of ASTM Committee G02 on Wear
and Erosion and is the direct responsibility of Subcommittee G02.40 on Non-
4.3 The higher the Galling value, the more galling resis-
Abrasive Wear.
tant is the test couple.
Current edition approved June 1, 2021. Published June 2021. Originally
approved in 2008. Last previous edition approved in 2016 as G196 – 08 (2016).
5. Significance and Use
DOI: 10.1520/G0196-08R21.
For referenced ASTM standards, visit the ASTM website, www.astm.org, or
5.1 This test method is designed to rank material couples in
contact ASTM Customer Service at service@astm.org. For Annual Book of ASTM
their resistance to the failure mode caused by galling and not
Standards volume information, refer to the standard’s Document Summary page on
the ASTM website. merely to classify the surface appearance of sliding surfaces.
Copyright © ASTM International, 100 Barr Harbor Drive, PO Box C700, West Conshohocken, PA 19428-2959. United States
G196 − 08 (2021)
5.2 This test method has been shown to have higher 6.3 A hardened steel ball with a diameter of 9.53 mm is
repeatability than Test Method G98 in determining the galling required for the testing procedure.
resistance. Test Method G98 can be used for initial ranking of
7. Test Specimen
galling resistance.
7.1 This test method uses two concentric hollow cylindrical
5.3 This test method should be considered when damaged
specimens with the ends mated. This results in area contact in
(galled) surfaces render components non-serviceable. Experi-
the shape of an annulus. One specimen is rotated about its axis
ence has shown that galling is most prevalent in sliding
and the other is held fixed.
systems that are slow moving and operate intermittently. The
galling and seizure of threaded components is a classic
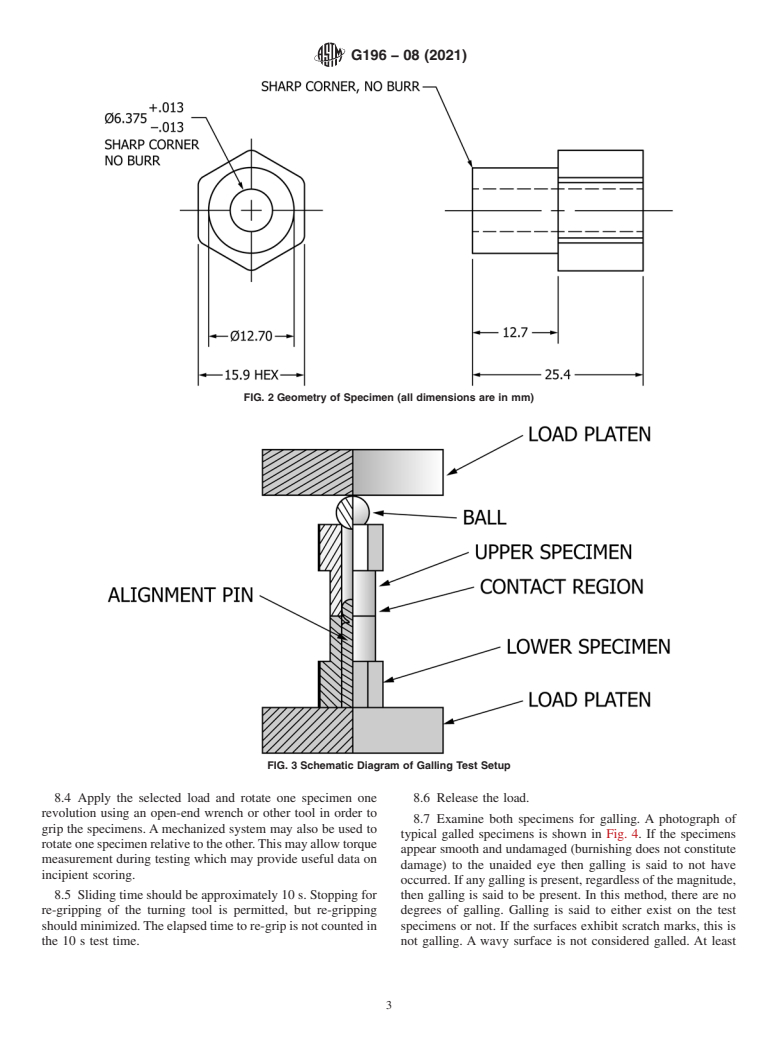
7.2 A typical geometry of the specimen is shown in Fig. 2.
example that this test method most closely simulates.
7.3 The critical dimensions of the specimens are the
5.4 Other galling-prone examples include: sealing surfaces
12.70 mm outer diameter and the 6.375 mm hole. All other
of valves that may leak excessively due to galling and pump dimensions may be varied to the user’s convenience. The hex
wear rings that may function ineffectively due to galling.
shape shown on the specimen is not required, however, it does
provide a convenient means of gripping the specimens during
5.5 If the equipment continues to operate satisfactorily and
testing.
loses dimension gradually, then galling is not present, and the
wear should be evaluated by a different test method.
7.4 A critical feature of the specimens is the flatness. The
contact surface of the specimen shall be flat within 0.005 mm
5.6 This test method should not be used for quantitative or
to ensure area contact. Flatness can be measured using a dial
final design purposes, since many environmental factors influ-
indicator.
ence the galling performance of materials in service.
Lubrication, alignment, stiffness, and geometry are only some
8. Procedure
of the factors that can affect how materials perform. This test
8.1 An overall view of the galling test setup is shown inFig.
method has proven valuable in screening materials for proto-
3.
typical testing that more closely simulates actual service
conditions.
8.2 Cleaning—Immediately prior to testing, clean the test
surfaces of the new specimens using a procedure that will
6. Apparatus
remove any scale, oil film, or foreign matter. The following
6.1 Commonly available laboratory equipment has been cleaning technique is suggested for metallic specimens:
used to conduct galling tests.Any apparatus that can apply and 8.2.1 Clean the specimens in an ultrasonic cleaner using
maintain a constant compressive load should be acceptable. mild ultrasonic cleaning detergent and warm water for 10 min.
The use of a displacement controlled machines is generally not 8.2.2 Rinse the specimens thoroughly with water.
acceptable for this test because small variations in displace- 8.2.3 Repeat this process using fresh solution.
ment of the specimens leads to large changes in the applied 8.2.4 After the final cleaning, dry the specimens with a
load. lint-free wipe.
8.2.5 Remove any spotting with acetone and a lint-free
6.2 The alignment of the specimens is accomplished via the
wipe.
alignment pin shown in Fig. 1.This pin is readily fabricated by
press fit of a tooling ball into a drill rod or similar shaft with an 8.3 Mount the new specimens in the loading device. Lightly
appropriately sized hole machined into the end of the pin. load the specimens. Twist the specimens relative to e
...


Questions, Comments and Discussion
Ask us and Technical Secretary will try to provide an answer. You can facilitate discussion about the standard in here.