ASTM E1735-07(2014)
(Test Method)Standard Test Method for Determining Relative Image Quality of Industrial Radiographic Film Exposed to X-Radiation from 4 to 25 MeV
Standard Test Method for Determining Relative Image Quality of Industrial Radiographic Film Exposed to X-Radiation from 4 to 25 MeV
SIGNIFICANCE AND USE
4.1 This test method provides a test for determining the relative image quality response of radiographic film when exposed to 4 to 25 MeV X rays as any single component of the total X-ray system (for example, screens) is varied. By holding the technique parameters (except exposure time) and processing parameters constant, the image quality response of radiographic film may be evaluated on a relative basis.
4.2 Alternately, this test method provides a test for measuring the image quality of the X-ray system or any component of the system.
SCOPE
1.1 This test method covers determination of the relative image quality response of industrial radiographic film when exposed to X-radiation sources having photon energies from 4 to 25 MeV. Evaluation of the film is based on the visibility of holes in a special image quality indicator (IQI). Since results for a given film type may vary, depending on the particular processing system and processing conditions used, it is essential to state the exposure parameters and achieved density, processing chemistry, processing cycle, and processing temperature. For the purposes of this test method, it is assumed that all components of the X-ray system are operating properly and are capable of producing a given image quality. This test method is not intended to be used for films exposed with Cobalt 60 sources or X-ray sources below 4 MeV.
1.2 The values stated in either SI or inch-pound units are to be regarded as the standard. The values given in parentheses are for information only.
1.3 This standard does not purport to address all of the safety concerns, if any, associated with its use. It is the responsibility of the user of this standard to establish appropriate safety and health practices and determine the applicability of regulatory limitations prior to use.
General Information
Relations
Buy Standard
Standards Content (Sample)
NOTICE: This standard has either been superseded and replaced by a new version or withdrawn.
Contact ASTM International (www.astm.org) for the latest information
Designation: E1735 − 07 (Reapproved 2014)
Standard Test Method for
Determining Relative Image Quality of Industrial
Radiographic Film Exposed to X-Radiation from 4 to 25
MeV
This standard is issued under the fixed designation E1735; the number immediately following the designation indicates the year of
original adoption or, in the case of revision, the year of last revision.Anumber in parentheses indicates the year of last reapproval.A
superscript epsilon (´) indicates an editorial change since the last revision or reapproval.
1. Scope E1079Practice for Calibration of Transmission Densitom-
eters
1.1 This test method covers determination of the relative
E1316Terminology for Nondestructive Examinations
image quality response of industrial radiographic film when
E1815Test Method for Classification of Film Systems for
exposed to X-radiation sources having photon energies from 4
Industrial Radiography
to 25 MeV. Evaluation of the film is based on the visibility of
holes in a special image quality indicator (IQI). Since results
3. Terminology
for a given film type may vary, depending on the particular
processing system and processing conditions used, it is essen-
3.1 Definitions—Definitionsoftermsrelatingtogammaand
tial to state the exposure parameters and achieved density, X-radiology are found in Terminology E1316.
processing chemistry, processing cycle, and processing tem-
perature.Forthepurposesofthistestmethod,itisassumedthat
4. Significance and Use
all components of the X-ray system are operating properly and
4.1 This test method provides a test for determining the
are capable of producing a given image quality. This test
relative image quality response of radiographic film when
method is not intended to be used for films exposed with
exposedto4to25MeVXraysasanysinglecomponentofthe
Cobalt 60 sources or X-ray sources below 4 MeV.
totalX-raysystem(forexample,screens)isvaried.Byholding
1.2 The values stated in either SI or inch-pound units are to
the technique parameters (except exposure time) and process-
be regarded as the standard. The values given in parentheses
ing parameters constant, the image quality response of radio-
are for information only.
graphic film may be evaluated on a relative basis.
1.3 This standard does not purport to address all of the
4.2 Alternately, this test method provides a test for measur-
safety concerns, if any, associated with its use. It is the
ingtheimagequalityoftheX-raysystemoranycomponentof
responsibility of the user of this standard to establish appro-
the system.
priate safety and health practices and determine the applica-
bility of regulatory limitations prior to use.
5. Test Specimen
5.1 The test specimen will consist of a 15-cm (6-in.) steel
2. Referenced Documents
absorber with a special IQI placed on the radiation (source)
2.1 ASTM Standards:
side of the absorber.
E999Guide for Controlling the Quality of Industrial Radio-
5.1.1 Absorber—Theabsorbershallbemadeofcarbonsteel
graphic Film Processing
or Type 300 stainless steel. The thickness of 15 cm (6 in.) can
E1025Practice for Design, Manufacture, and Material
be achieved by stacking thinner plates whose length and width
Grouping Classification of Hole-Type Image Quality In-
shall be at least 20 by 25 cm (8 by 10 in.). The surface finish
dicators (IQI) Used for Radiology
of the top and bottom of the absorber shall be a maximum of
6.3-µm (250-µin.) R ground finish.
a
This test method is under the jurisdiction of ASTM Committee E07 on
5.1.2 Image Quality Indicator—The IQI shall be fabricated
Nondestructive Testing and is the direct responsibility of Subcommittee E07.01 on
ofcarbonsteelorType300stainlesssteelandshallconformto
Radiology (X and Gamma) Method.
Fig. 1. The IQI steps, identified as Plaques A-D, may be
CurrenteditionapprovedJune1,2014.PublishedJuly2014.Originallyapproved
fabricated separately and then taped together, as shown in Fig.
in 1995. Last previous edition approved in 2007 as E1735-07. DOI: 10.1520/
E1735-07R14.
1,usingsuitabletapetoformthearrayasshown.Thetapeshall
For referenced ASTM standards, visit the ASTM website, www.astm.org, or
not cover any of the holes in the IQI. The surface finish of the
contact ASTM Customer Service at service@astm.org. For Annual Book of ASTM
IQI top and bottom surfaces shall be a maximum of 6.3-µm
Standards volume information, refer to the standard’s Document Summary page on
the ASTM website. (250-µin.) R ground finish.
a
Copyright © ASTM International, 100 Barr Harbor Drive, PO Box C700, West Conshohocken, PA 19428-2959. United States
E1735 − 07 (2014)
NOTE1—Allplaquesidenticalexceptholesizeandplaquethicknesshole:rowspacingtolerance 60.1mm(60.004in.),nonaccumulativeDimension
A=10 60.1mm(0.395 60.004in.)andDimensionB=12.5 60.1mm(0.492 60.004in.);otherdimensionsinaccordancewithstandardengineering
practice.
Plaque Letter Plaque Thickness Hole Set Hole Diameter
mm (in.) mm (in.)
A 1.6 ± 0.025 (0.0625 ± 0.001) 1 3.0 ± 0.025 (0.118 ± 0.001)
B 1.3 ± 0.025 (0.050 ± 0.001) 2 1.8 ± 0.025 (0.072 ± 0.001)
C 0.97 ± 0.025 (0.038 ± 0.001) 3 1.8 ± 0.025 (0.072 ± 0.001)
D 0.64 ± 0.025 (0.025 ± 0.001) 4 1.5 ± 0.025 (0.060 ± 0.001)
5 1.5 ± 0.025 (0.060 ± 0.001)
6 1.22 ± 0.025 (0.048 ± 0.001)
7 1.42 ± 0.025 (0.056 ± 0.001)
8 1.17 ± 0.025 (0.046 ± 0.001)
9 0.94 ± 0.025 (0.037 ± 0.001)
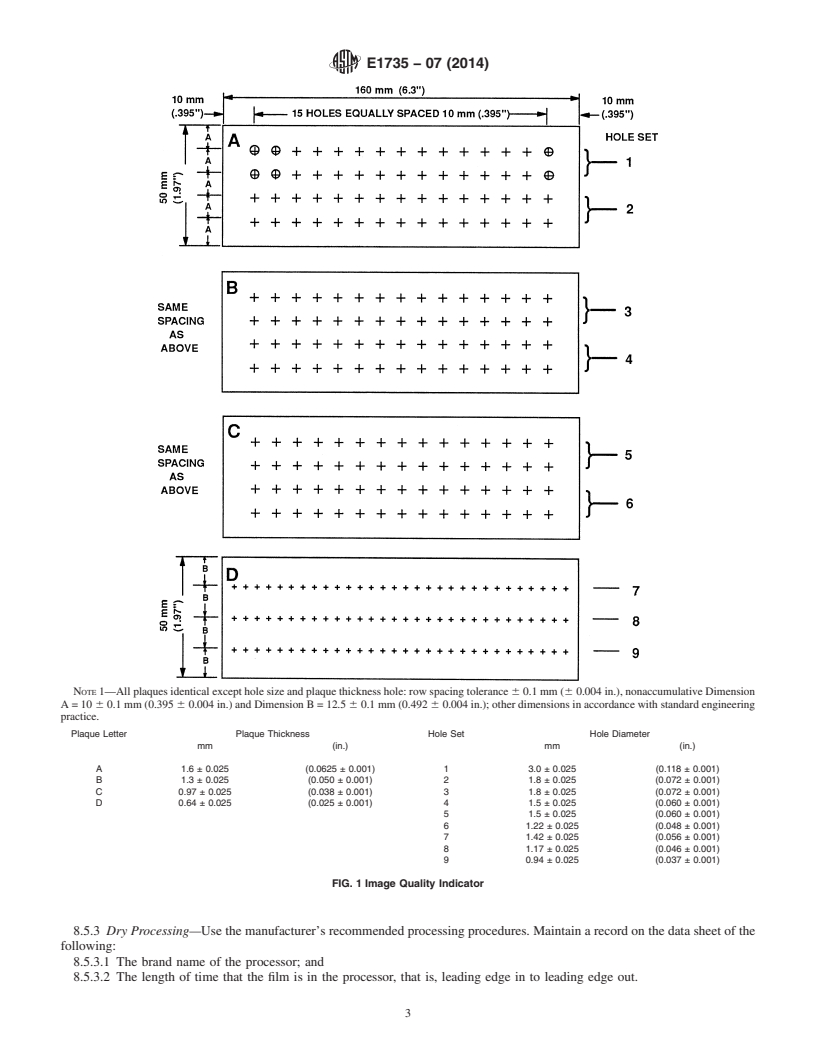
FIG. 1 Image Quality Indicator
6. Radiation Source 7. Film Holder and Screens
6.1 The source of radiation shall be an X-ray generator 7.1 Film Holder—The film holder shall be a medical-type,
capable of operating in any part (or all) of the range from 4 to hard-backedcassetteoraflexiblefilmholderwithavacuumor
25 MeV. mechanical means for providing good film-screen contact.
E1735 − 07 (2014)
Organization: _____________________________________ Date: ______
Film and Exposure Data
Film Type ______________________ Reader __________________
Megavoltage ____________________ X-Ray Source ____________
Intrinsic, built-in Intrinsic filter
filter material ___________________ thickness ________________
Added filter material ______________ Added filter
thickness ________________
Source to Film Distance ___________ Focal Spot mA-S/RADS _________
Size _______
Screens (Material) _________ Thickness: Front _____ Back _____
____ ____
Processing
Automatic Manual Dry
Processor Brand
Type __________
Developer Brand Developer Processor
Type ___________ Brand Brand
Type ___________ Type ___________
Temp. __________ Temp. __________ Temp. __________
Time ___________ Time ___________ Time ___________
Replenishment
Rate ____________________ Seasoning: auto. _____ manual dry ____
_____
Interpretation
IQI Plaque Hole Index Number of Visible Holes
Thickness (T) Dia. (D) (T)×(D)
2 2
mm in. mm in. mm in. Expos. Expos. Expos. Avg.
1.60 0.063 3.00 0.118 4.80 0.0074 ____ ____ ____ ____
1.80 0.072 2.88 0.0045 ____ ____ ____ ____
1.30 0.050 1.80 0.072 2.34 0.0036 ____ ____ ____ ____
1.50 0.060 1.95 0.0030 ____ ____ ____ ____
0.97 0.038 1.50 0.060 1.43 0.0023 ____ ____ ____ ____
1.22 0.048 1.16 0.0018 ____ ____ ____ ____
0.64 0.025 1.42 0.056 0.91 0.0016 ____ ____ ____ ____
1.17 0.046 0.75 0.0012 ____ ____ ____ ____
0.94 0.037 0.60 0.009 ____ ____ ____ ____
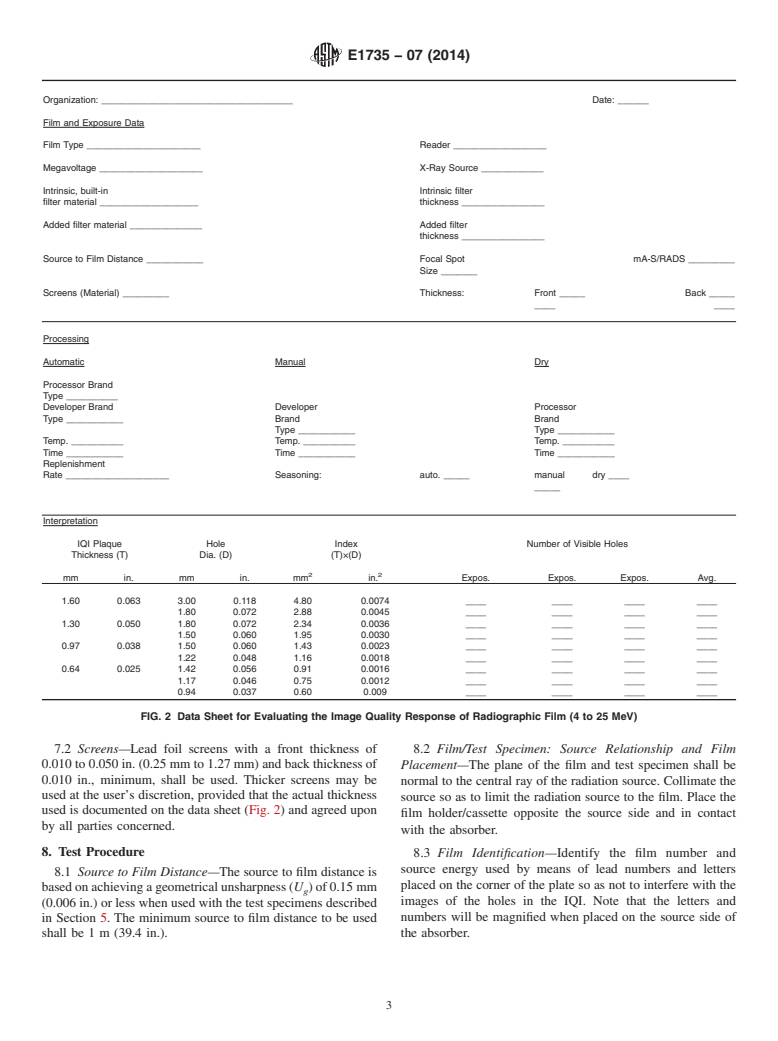
FIG. 2 Data Sheet for Evaluating the Image Quality Response of Radiographic Film (4 to 25 MeV)
7.2 Screens—Lead foil screens with a front thickness of 8.2 Film/Test Specimen: Source Relationship and Film
0.010to0.050in.(0.25mmto1.27mm)andbackthicknessof
Placement—The plane of the film and test specimen shall be
0.010 in., minimum, shall be used. Thicker screens may be
normal to the central ray of the radiation source. Collimate the
used at the user’s discretion, provided that the actual thickness
source so as to limit the radiation source to the film. Place the
used is do
...
This document is not an ASTM standard and is intended only to provide the user of an ASTM standard an indication of what changes have been made to the previous version. Because
it may not be technically possible to adequately depict all changes accurately, ASTM recommends that users consult prior editions as appropriate. In all cases only the current version
of the standard as published by ASTM is to be considered the official document.
Designation: E1735 − 07 E1735 − 07 (Reapproved 2014)
Standard Test Method for
Determining Relative Image Quality of Industrial
Radiographic Film Exposed to X-Radiation from 4 to 25
MeV
This standard is issued under the fixed designation E1735; the number immediately following the designation indicates the year of
original adoption or, in the case of revision, the year of last revision. A number in parentheses indicates the year of last reapproval. A
superscript epsilon (´) indicates an editorial change since the last revision or reapproval.
1. Scope
1.1 This test method covers determination of the relative image quality response of industrial radiographic film when exposed
to X-radiation sources having photon energies from 4 to 25 MeV. Evaluation of the film is based on the visibility of holes in a
special image quality indicator (IQI). Since results for a given film type may vary, depending on the particular processing system
and processing conditions used, it is essential to state the exposure parameters and achieved density, processing chemistry,
processing cycle, and processing temperature. For the purposes of this test method, it is assumed that all components of the X-ray
system are operating properly and are capable of producing a given image quality. This test method is not intended to be used for
films exposed with Cobalt 60 sources or X-ray sources below 4 MeV.
1.2 The values stated in either SI or inch-pound units are to be regarded as the standard. The values given in parentheses are
for information only.
1.3 This standard does not purport to address all of the safety concerns, if any, associated with its use. It is the responsibility
of the user of this standard to establish appropriate safety and health practices and determine the applicability of regulatory
limitations prior to use.
2. Referenced Documents
2.1 ASTM Standards:
E999 Guide for Controlling the Quality of Industrial Radiographic Film Processing
E1025 Practice for Design, Manufacture, and Material Grouping Classification of Hole-Type Image Quality Indicators (IQI)
Used for Radiology
E1079 Practice for Calibration of Transmission Densitometers
E1316 Terminology for Nondestructive Examinations
E1815 Test Method for Classification of Film Systems for Industrial Radiography
3. Terminology
3.1 Definitions—Definitions of terms relating to gamma and X-radiology are found in Terminology E1316.
4. Significance and Use
4.1 This test method provides a test for determining the relative image quality response of radiographic film when exposed to
4 to 25 MeV X rays as any single component of the total X-ray system (for example, screens) is varied. By holding the technique
parameters (except exposure time) and processing parameters constant, the image quality response of radiographic film may be
evaluated on a relative basis.
4.2 Alternately, this test method provides a test for measuring the image quality of the X-ray system or any component of the
system.
This test method is under the jurisdiction of ASTM Committee E07 on Nondestructive Testing and is the direct responsibility of Subcommittee E07.01 on Radiology
(X and Gamma) Method.
Current edition approved Feb. 15, 2007June 1, 2014. Published March 2007July 2014. Originally approved in 1995. Last previous edition approved in 20002007 as
ε1
E1735 - 95E1735 - 07.(2000) . DOI: 10.1520/E1735-07.10.1520/E1735-07R14.
For referenced ASTM standards, visit the ASTM website, www.astm.org, or contact ASTM Customer Service at service@astm.org. For Annual Book of ASTM Standards
volume information, refer to the standard’s Document Summary page on the ASTM website.
Copyright © ASTM International, 100 Barr Harbor Drive, PO Box C700, West Conshohocken, PA 19428-2959. United States
E1735 − 07 (2014)
5. Test Specimen
5.1 The test specimen will consist of a 15-cm (6-in.) steel absorber with a special IQI placed on the radiation (source) side of
the absorber.
5.1.1 Absorber—The absorber shall be made of carbon steel or Type 300 stainless steel. The thickness of 15 cm (6 in.) can be
achieved by stacking thinner plates whose length and width shall be at least 20 by 25 cm (8 by 10 in.). The surface finish of the
top and bottom of the absorber shall be a maximum of 6.3-μm (250-μin.) R ground finish.
a
5.1.2 Image Quality Indicator—The IQI shall be fabricated of carbon steel or Type 300 stainless steel and shall conform to Fig.
1. The IQI steps, identified as Plaques A-D, may be fabricated separately and then taped together, as shown in Fig. 1, using suitable
tape to form the array as shown. The tape shall not cover any of the holes in the IQI. The surface finish of the IQI top and bottom
surfaces shall be a maximum of 6.3-μm (250-μin.) R ground finish.
a
6. Radiation Source
6.1 The source of radiation shall be an X-ray generator capable of operating in any part (or all) of the range from 4 to 25 MeV.
7. Film Holder and Screens
7.1 Film Holder—The film holder shall be a medical-type, hard-backed cassette or a flexible film holder with a vacuum or
mechanical means for providing good film-screen contact.
7.2 Screens—Lead foil screens with a front thickness of 0.010 to 0.050 in. (0.25 mm to 1.27 mm) and back thickness of 0.010
in., minimum, shall be used. Thicker screens may be used at the user’s discretion, provided that the actual thickness used is
documented on the data sheet (Fig. 2) and agreed upon by all parties concerned.
8. Test Procedure
8.1 Source to Film Distance—The source to film distance is based on achieving a geometrical unsharpness (U ) of 0.15 mm
g
(0.006 in.) or less when used with the test specimens described in Section 5. The minimum source to film distance to be used shall
be 1 m (39.4 in.).
8.2 Film/Test Specimen: Source Relationship and Film Placement—The plane of the film and test specimen shall be normal to
the central ray of the radiation source. Collimate the source so as to limit the radiation source to the film. Place the film
holder/cassette opposite the source side and in contact with the absorber.
8.3 Film Identification—Identify the film number and source energy used by means of lead numbers and letters placed on the
corner of the plate so as not to interfere with the images of the holes in the IQI. Note that the letters and numbers will be magnified
when placed on the source side of the absorber.
8.4 Exposure—Adjust the exposure time to provide a film density of 2.00 6 0.1 in the center of the film, as measured with a
densitometer calibrated in accordance with Practice E1079. Make three exposures using the same film holder/cassette in
accordance with 7.1.
8.5 Film Processing—In order to minimize any effects caused by the latent image instability, process the exposed film not more
than 4 hours after exposure. Either manual or automatic processing may be used, in accordance with Guide E999 and as follows:
8.5.1 Automatic Processing—Use industrial X-ray film automatic processing solutions. Maintain a record on the data sheet of
the following:
8.5.1.1 The brand name and type of processor;
8.5.1.2 The length of time (61 s) that the film is in the developer, that is, leading edge in to leading edge out;
8.5.1.3 The brand name of the processing chemicals, including the starter, processing temperature to within 0.5°C, and
replenishment rate; and
8.5.1.4 The total quantity of film used in seasoning fresh developer solutions. With fresh developer solutions, process a
minimum of ten films (360 by 430 mm (14 by 17 in.))/gal of developer. Each film should be half-flashed to a density of 4.0 or
greater using white light or, alternatively, fully flash alternate sheets.
8.5.2 Manual Processing—Use industrial X-ray film processing solutions in the tests. Maintain a record on the data sheet of the
following:
8.5.2.1 The time of development (6 2 s);
8.5.2.2 The temperature of the developer withi
...


Questions, Comments and Discussion
Ask us and Technical Secretary will try to provide an answer. You can facilitate discussion about the standard in here.