ASTM F1940-07a
(Test Method)Standard Test Method for Process Control Verification to Prevent Hydrogen Embrittlement in Plated or Coated Fasteners
Standard Test Method for Process Control Verification to Prevent Hydrogen Embrittlement in Plated or Coated Fasteners
SIGNIFICANCE AND USE
This test method establishes a means to verify the prevention, to the extent possible, of IHE in steel fasteners during manufacture by maintaining strict controls during production operations such as surface preparation, pretreatments, and plating or coating. It is intended to be used as a qualification test for new or revised plating or coating processes and as a periodic inspection audit for the control of a plating or coating process.
Passing this test allows fasteners to be stressed in tension to the minimum specified tensile load in air with almost no possibility of time delayed fracture in air as a result of IHE from processing. If the amount of residual hydrogen is not sufficient to induce cracking or fracture in the specimen under worst case conditions, then it can be concluded that all of the lots of fasteners processed during that period will not have sufficient residual hydrogen from processing to induce hydrogen embrittlement of the fasteners under stress in air if the process remains in control, unchanged and stable.
If certified specimens with demonstrated sensitivity to IHE, processed with the fasteners, have a threshold ≥75 % of the incremental step load notched bend fracture stress, NFS(B)F 1624, it is assumed that all fasteners processed the same way during the period will also pass any sustained load IHE test.
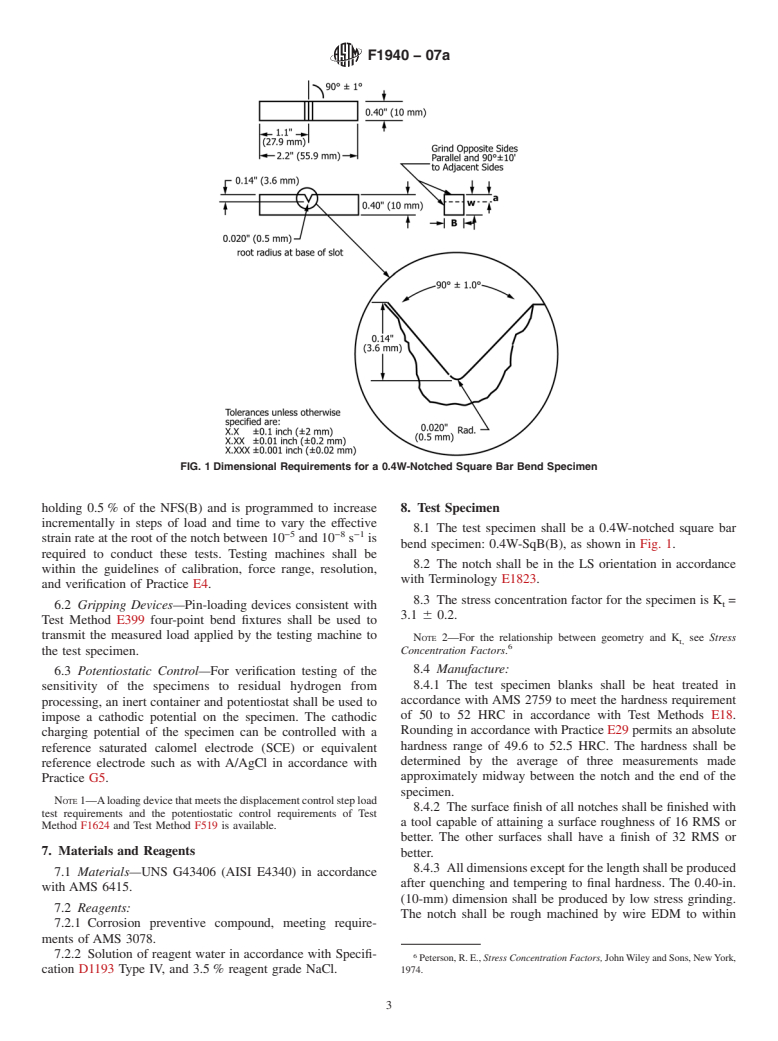
FIG. 1 Dimensional Requirements for a 0.4W-Notched Square Bar Bend Specimen
SCOPE
1.1 This test method covers a procedure to prevent, to the extent possible, internal hydrogen embrittlement (IHE) of fasteners by monitoring the plating or coating process, such as those described in Specifications F 1137 and F 1941. The process is quantitatively monitored on a periodic basis with a minimum number of specimens as compared to qualifying each lot of fasteners being plated or coated. Trend analysis is used to ensure quality as compared to statistical sampling analysis of each lot of fasteners. This test method consists of a mechanical test for the evaluation and control of the potential for IHE that may arise from various sources of hydrogen in a plating or coating process.
1.2 This test method consists of a mechanical test, conducted on a standard specimen used as a witness, for the evaluation and control of the potential for IHE that may arise from various sources of hydrogen in a plating or coating process.
1.3 This test method is limited to evaluating hydrogen induced embrittlement due only to processing (IHE) and not due to environmental exposure (EHE, see Test Method F 1624).
1.4 This test method is not intended to measure the relative susceptibility of steels to either IHE or EHE.
1.5 This test method is limited to evaluating processes used for plating or coating ferrous fasteners.
1.6 This test method uses a notched square bar specimen that conforms to Test Method F 519, Type 1e, except that the radius is increased to accommodate the deposition of a larger range of platings and coatings. For the background on Test Method F 519 testing, see publications ASTM STP 543 and ASTM STP 962. The stress concentration factor is at a Kt = 3.1 0.2. The sensitivity is demonstrated with a constant imposed cathodic potential to control the amount of hydrogen. Both the sensitivity and the baseline for residual hydrogen will be established with tests on bare metal specimens in air.
1.7 The sensitivity of each lot of specimens to IHE shall be demonstrated. A specimen made of AISI E4340 steel heat treated to a hardness range of 50 to 52 HRC is used to produce a "worst case" condition and maximize sensitivity to IHE.
1.8 The test is an accelerated (24 h) test method to measure the threshold for hydrogen stress cracking, and is used to quantify the amount of residual hydrogen in the specimen. The specimen undergoes sustained load and slow strain rate testing by using incremental loads and hold times under displacement control to measure a threshold stress in an accelerat...
General Information
Relations
Standards Content (Sample)
NOTICE: This standard has either been superseded and replaced by a new version or withdrawn.
Contact ASTM International (www.astm.org) for the latest information
Designation:F1940 −07a
StandardTest Method for
Process Control Verification to Prevent Hydrogen
1
Embrittlement in Plated or Coated Fasteners
This standard is issued under the fixed designation F1940; the number immediately following the designation indicates the year of
original adoption or, in the case of revision, the year of last revision.Anumber in parentheses indicates the year of last reapproval.A
superscript epsilon (´) indicates an editorial change since the last revision or reapproval.
1. Scope 3.1 6 0.2. The sensitivity is demonstrated with a constant
imposed cathodic potential to control the amount of hydrogen.
1.1 This test method covers a procedure to prevent, to the
Boththesensitivityandthebaselineforresidualhydrogenwill
extent possible, internal hydrogen embrittlement (IHE) of
be established with tests on bare metal specimens in air.
fasteners by monitoring the plating or coating process, such as
those described in Specifications F1137 and F1941. The 1.7 The sensitivity of each lot of specimens to IHE shall be
process is quantitatively monitored on a periodic basis with a demonstrated. A specimen made of AISI E4340 steel heat
minimumnumberofspecimensascomparedtoqualifyingeach treatedtoahardnessrangeof50to52HRCisusedtoproduce
lotoffastenersbeingplatedorcoated.Trendanalysisisusedto a “worst case” condition and maximize sensitivity to IHE.
ensure quality as compared to statistical sampling analysis of
1.8 The test is an accelerated (≤24 h) test method to
eachlotoffasteners.Thistestmethodconsistsofamechanical
measurethethresholdforhydrogenstresscracking,andisused
test for the evaluation and control of the potential for IHE that
to quantify the amount of residual hydrogen in the specimen.
may arise from various sources of hydrogen in a plating or
The specimen undergoes sustained load and slow strain rate
coating process.
testing by using incremental loads and hold times under
1.2 This test method consists of a mechanical test, con- displacement control to measure a threshold stress in an
ducted on a standard specimen used as a witness, for the accelerated manner in accordance with Test Method F1624.
evaluation and control of the potential for IHE that may arise
1.9 In this test method, bending is used instead of tension
from various sources of hydrogen in a plating or coating
becauseitproducesthemaximumlocallimitloadtensilestress
process.
in a notched bar of up to 2.3 times the yield strength as
1.3 This test method is limited to evaluating hydrogen measured in accordance with Test Method E8. A fastener that
induced embrittlement due only to processing (IHE) and not isunintentionallyexposedtobendingoninstallationmayattain
duetoenvironmentalexposure(EHE,seeTestMethodF1624). this maximum local tensile stress.
1.4 This test method is not intended to measure the relative 1.10 The values stated in inch-pound units are to be re-
susceptibility of steels to either IHE or EHE. garded as standard. The values given in parentheses are
mathematical conversions to SI units that are provided for
1.5 This test method is limited to evaluating processes used
information only and are not considered standard.
for plating or coating ferrous fasteners.
1.11 This standard does not purport to address all of the
1.6 This test method uses a notched square bar specimen
safety concerns, if any, associated with its use. It is the
that conforms to Test Method F519, Type 1e, except that the
responsibility of the user of this standard to establish appro-
radius is increased to accommodate the deposition of a larger
priate safety and health practices and determine the applica-
range of platings and coatings. For the background on Test
2 bility of regulatory limitations prior to use.
Method F519 testing, see publications ASTM STP 543 and
3
ASTM STP 962. The stress concentration factor is at a K =
t
2. Referenced Documents
4
2.1 ASTM Standards:
1
This test method is under the jurisdiction of ASTM Committee F16 on D1193Specification for Reagent Water
Fasteners and is the direct responsibility of Subcommittee F16.93 on Quality
E4Practices for Force Verification of Testing Machines
Assurance Provisions for Fasteners.
E8Test Methods for Tension Testing of Metallic Materials
Current edition approved Sept. 1, 2007. Published September 2007. Originally
published as approved in 1998. Last previous edition approved in 2007 as
F1940–07. DOI: 10.1520/F1940-07A.
2 4
Hydrogen Embrittlement Testing, ASTM STP 543, American Society for For referenced ASTM standards, visit the ASTM website, www.astm.org, or
Testing and Materials, 1974. contact ASTM Customer Service at service@astm.org. For Annual Book of ASTM
3
Hydrogen Embrittlement; Prevention and Control, ASTM STP 962, American Standards volume information, refer to the standard’s Document Summary page on
Society for Testing and Materials
...


Questions, Comments and Discussion
Ask us and Technical Secretary will try to provide an answer. You can facilitate discussion about the standard in here.