ASTM E751/E751M-17(2022)
(Practice)Standard Practice for Acoustic Emission Monitoring During Resistance Spot-Welding
Standard Practice for Acoustic Emission Monitoring During Resistance Spot-Welding
SIGNIFICANCE AND USE
5.1 The AE produced during the production of a spot-weld can be related to weld quality parameters such as the strength and size of the nugget, the amount of expulsion, and the amount of cracking. Therefore, in-process AE monitoring can be used both as an examination method, and as a means for providing feedback control.
SCOPE
1.1 This practice describes procedures for the measurement, processing, and interpretation of the acoustic emission (AE) response associated with selected stages of the resistance spot-welding process.
1.2 This practice also provides recommendations for feedback control by utilizing the measured AE response signals during the spot-welding process.
1.3 Units—The values stated in either SI units or inch-pound units are to be regarded separately as standard. The values stated in each system may not be exact equivalents; therefore, each system shall be used independently of the other. Combining values from the two systems may result in non-conformance with the standard.
1.4 This standard does not purport to address all of the safety concerns, if any, associated with its use. It is the responsibility of the user of this standard to establish appropriate safety, health, and environmental practices and determine the applicability of regulatory limitations prior to use.
1.5 This international standard was developed in accordance with internationally recognized principles on standardization established in the Decision on Principles for the Development of International Standards, Guides and Recommendations issued by the World Trade Organization Technical Barriers to Trade (TBT) Committee.
General Information
- Status
- Published
- Publication Date
- 30-Nov-2022
- Technical Committee
- E07 - Nondestructive Testing
- Drafting Committee
- E07.04 - Acoustic Emission Method
Relations
- Effective Date
- 01-Feb-2024
- Effective Date
- 01-Dec-2019
- Effective Date
- 01-Mar-2019
- Effective Date
- 01-Jan-2018
- Effective Date
- 15-Jun-2017
- Effective Date
- 01-Feb-2017
- Effective Date
- 01-Aug-2016
- Effective Date
- 01-Feb-2016
- Effective Date
- 01-Dec-2015
- Effective Date
- 01-Sep-2015
- Effective Date
- 01-Jun-2014
- Effective Date
- 01-Jun-2014
- Effective Date
- 01-Dec-2013
- Effective Date
- 15-Jun-2013
- Effective Date
- 01-Jun-2013
Overview
The ASTM E751/E751M-17(2022) standard, titled “Standard Practice for Acoustic Emission Monitoring During Resistance Spot-Welding,” provides established procedures for measuring, processing, and interpreting acoustic emission (AE) signals generated throughout the resistance spot-welding process. Developed by ASTM International, this standard outlines methods to use AE monitoring as a quality control tool, facilitating both the examination and feedback control of weld quality. AE signals can correlate with critical weld quality parameters such as the size and strength of the weld nugget, expulsion, and cracking. This enables both real-time assurance and process optimization within various manufacturing sectors.
Key Topics
- Acoustic Emission (AE) Monitoring: AE generated during spot-welding is detected, interpreted, and applied to assess weld quality throughout discrete process stages, including electrode set-down, current flow, nugget formation, solidification, and lift-off.
- Feedback Control: By utilizing real-time AE measurements, feedback loops can adjust welding process variables (such as weld time or current), compensating for condition changes like electrode wear or material variation.
- Quality Indicators: AE parameters are linked to key weld quality factors, including nugget size, strength, expulsion (material spitting/flashing), and cracking; these indicators allow automated or operator-interpreted evaluation.
- Equipment Recommendations: Outlines requirements for AE sensors and data acquisition systems, including timing, amplitude discrimination, and the ability to provide output for monitoring and control.
- Personnel and Agency Qualifications: Recommends that examinations be performed by qualified nondestructive testing (NDT) personnel and agencies, referencing standards such as ANSI/ASNT CP-189 and ISO 9712.
- Safety and Units: Highlights the need for proper safety, health, and environmental practices and provides guidance on the use of SI and inch-pound units.
Applications
- Automotive Manufacturing: Enables in-process weld quality assurance on automotive body assemblies, where high joint reliability is required.
- Aerospace: Supports quality and traceability in aircraft components by ensuring strong, defect-free welds through continuous monitoring.
- Electronics and Appliances: Useful for any industry employing resistance spot-welding on sheet metal, enhancing process control and reducing the incidence of defective products.
- On-Line Monitoring and Control:
- Monitoring: Identifies, segregates, and documents unacceptable welds via audio or visual alarms or data recording, supporting quality assurance and traceability.
- Feedback Control: Automated adjustment of welding parameters in response to AE feedback to maintain consistent weld quality even as conditions (electrode wear, material variations) evolve.
- Productivity and Cost Savings: Detects welding defects early, reducing scrap, rework, and operational downtimes.
- Process Optimization: AE monitoring provides insights for process improvements, contributing to higher yields and lower maintenance costs.
Related Standards
- ASTM E543 – Specification for Agencies Performing Nondestructive Testing
- ASTM E1316 – Terminology for Nondestructive Examinations
- ASNT SNT-TC-1A – Recommended Practice for Nondestructive Testing Personnel Qualification and Certification
- ANSI/ASNT CP-189 – Standard for Qualification and Certification of Nondestructive Testing Personnel
- AIA NAS-410 – Certification and Qualification of Nondestructive Testing Personnel
- ISO 9712 – Non-Destructive Testing: Qualification and Certification of NDT Personnel
By following ASTM E751/E751M-17(2022), organizations can systematically implement acoustic emission monitoring to ensure high weld quality, enable process feedback control, and foster compliance with both customer and regulatory quality requirements in resistance spot-welding operations. This contributes to product safety, reliability, and quality across diverse industries.
Buy Documents
ASTM E751/E751M-17(2022) - Standard Practice for Acoustic Emission Monitoring During Resistance Spot-Welding
Get Certified
Connect with accredited certification bodies for this standard

National Aerospace and Defense Contractors Accreditation Program (NADCAP)
Global cooperative program for special process quality in aerospace.

BSMI (Bureau of Standards, Metrology and Inspection)
Taiwan's standards and inspection authority.

CARES (UK Certification Authority for Reinforcing Steels)
UK certification for reinforcing steels and construction.
Sponsored listings
Frequently Asked Questions
ASTM E751/E751M-17(2022) is a standard published by ASTM International. Its full title is "Standard Practice for Acoustic Emission Monitoring During Resistance Spot-Welding". This standard covers: SIGNIFICANCE AND USE 5.1 The AE produced during the production of a spot-weld can be related to weld quality parameters such as the strength and size of the nugget, the amount of expulsion, and the amount of cracking. Therefore, in-process AE monitoring can be used both as an examination method, and as a means for providing feedback control. SCOPE 1.1 This practice describes procedures for the measurement, processing, and interpretation of the acoustic emission (AE) response associated with selected stages of the resistance spot-welding process. 1.2 This practice also provides recommendations for feedback control by utilizing the measured AE response signals during the spot-welding process. 1.3 Units—The values stated in either SI units or inch-pound units are to be regarded separately as standard. The values stated in each system may not be exact equivalents; therefore, each system shall be used independently of the other. Combining values from the two systems may result in non-conformance with the standard. 1.4 This standard does not purport to address all of the safety concerns, if any, associated with its use. It is the responsibility of the user of this standard to establish appropriate safety, health, and environmental practices and determine the applicability of regulatory limitations prior to use. 1.5 This international standard was developed in accordance with internationally recognized principles on standardization established in the Decision on Principles for the Development of International Standards, Guides and Recommendations issued by the World Trade Organization Technical Barriers to Trade (TBT) Committee.
SIGNIFICANCE AND USE 5.1 The AE produced during the production of a spot-weld can be related to weld quality parameters such as the strength and size of the nugget, the amount of expulsion, and the amount of cracking. Therefore, in-process AE monitoring can be used both as an examination method, and as a means for providing feedback control. SCOPE 1.1 This practice describes procedures for the measurement, processing, and interpretation of the acoustic emission (AE) response associated with selected stages of the resistance spot-welding process. 1.2 This practice also provides recommendations for feedback control by utilizing the measured AE response signals during the spot-welding process. 1.3 Units—The values stated in either SI units or inch-pound units are to be regarded separately as standard. The values stated in each system may not be exact equivalents; therefore, each system shall be used independently of the other. Combining values from the two systems may result in non-conformance with the standard. 1.4 This standard does not purport to address all of the safety concerns, if any, associated with its use. It is the responsibility of the user of this standard to establish appropriate safety, health, and environmental practices and determine the applicability of regulatory limitations prior to use. 1.5 This international standard was developed in accordance with internationally recognized principles on standardization established in the Decision on Principles for the Development of International Standards, Guides and Recommendations issued by the World Trade Organization Technical Barriers to Trade (TBT) Committee.
ASTM E751/E751M-17(2022) is classified under the following ICS (International Classification for Standards) categories: 17.140.20 - Noise emitted by machines and equipment; 25.160.10 - Welding processes. The ICS classification helps identify the subject area and facilitates finding related standards.
ASTM E751/E751M-17(2022) has the following relationships with other standards: It is inter standard links to ASTM E1316-24, ASTM E1316-19b, ASTM E1316-19, ASTM E1316-18, ASTM E1316-17a, ASTM E1316-17, ASTM E1316-16a, ASTM E1316-16, ASTM E1316-15a, ASTM E1316-15, ASTM E1316-14e1, ASTM E1316-14, ASTM E1316-13d, ASTM E1316-13c, ASTM E1316-13b. Understanding these relationships helps ensure you are using the most current and applicable version of the standard.
ASTM E751/E751M-17(2022) is available in PDF format for immediate download after purchase. The document can be added to your cart and obtained through the secure checkout process. Digital delivery ensures instant access to the complete standard document.
Standards Content (Sample)
This international standard was developed in accordance with internationally recognized principles on standardization established in the Decision on Principles for the
Development of International Standards, Guides and Recommendations issued by the World Trade Organization Technical Barriers to Trade (TBT) Committee.
Designation: E751/E751M − 17 (Reapproved 2022)
Standard Practice for
Acoustic Emission Monitoring During Resistance Spot-
Welding
This standard is issued under the fixed designation E751/E751M; the number immediately following the designation indicates the year
of original adoption or, in the case of revision, the year of last revision. A number in parentheses indicates the year of last reapproval.
A superscript epsilon (´) indicates an editorial change since the last revision or reapproval.
1. Scope 2.2 ASNT Standards:
SNT-TC-1A Recommended Practice for Nondestructive
1.1 This practice describes procedures for the measurement,
Testing Personnel Qualification and Certification
processing, and interpretation of the acoustic emission (AE)
ANSI/ASNT CP-189 Standard for Qualification and Certifi-
response associated with selected stages of the resistance
cation of Nondestructive Testing Personnel
spot-welding process.
2.3 AIA Standard:
1.2 This practice also provides recommendations for feed-
NAS-410 Certification and Qualification of Nondestructive
back control by utilizing the measured AE response signals
Personnel (Quality Assurance Committee)
during the spot-welding process. 5
2.4 ISO Standard:
ISO 9712 Non-Destructive Testing: Qualification and Certi-
1.3 Units—The values stated in either SI units or inch-
pound units are to be regarded separately as standard. The fication of NDT Personnel
values stated in each system may not be exact equivalents;
3. Terminology
therefore, each system shall be used independently of the other.
3.1 Definitions—For definitions of terms relating to acoustic
Combining values from the two systems may result in non-
emission testing, see Section B of Terminology E1316.
conformance with the standard.
1.4 This standard does not purport to address all of the
4. Summary of Practice
safety concerns, if any, associated with its use. It is the
4.1 The resistance spot-welding process consists of several
responsibility of the user of this standard to establish appro-
stages. These are the set-down of the electrodes, squeeze,
priate safety, health, and environmental practices and deter-
current flow, forging, hold time, and lift-off. Various types of
mine the applicability of regulatory limitations prior to use.
acoustic emission signals are produced during each of these
1.5 This international standard was developed in accor-
stages. Often, these signals can be identified with respect to the
dance with internationally recognized principles on standard-
nature of their source. The individual signal elements may be
ization established in the Decision on Principles for the
greatly different, or totally absent, in various materials,
Development of International Standards, Guides and Recom-
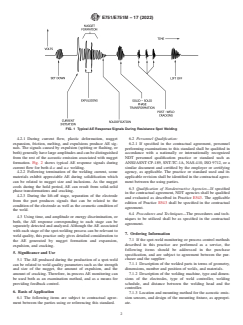
thicknesses, and so forth. Fig. 1 is a schematic representation
mendations issued by the World Trade Organization Technical
showing typical signal elements which may be present in the
Barriers to Trade (TBT) Committee.
AE signature from a given spot-weld.
2. Referenced Documents 4.2 Most of the depictedAE signal features can be related to
factors of weld quality. TheAE occurring during set-down and
2.1 ASTM Standards:
squeeze can often be related to the condition of the electrodes
E543 Specification for Agencies Performing Nondestructive
and the surface of the parts. The large, often brief, signal at
Testing
current initiation can be related to the initial resistance, and the
E1316 Terminology for Nondestructive Examinations
cleanliness of the part. For example, burning through of certain
oxide layers contributes to the acoustic emission response
during this time.
This practice is under the jurisdiction of ASTM Committee E07 on Nonde-
structive Testing and is the direct responsibility of Subcommittee E07.04 on
Acoustic Emission Method. AvailablefromAmericanSocietyforNondestructiveTesting(ASNT),P.O.Box
Current edition approved Dec. 1, 2022. Published December 2022. Originally 28518, 1711 Arlingate Ln., Columbus, OH 43228-0518, http://www.asnt.org.
approved in 1980. Last previous edition approved in 2017 as E751/E751M – 17. Available fromAerospace IndustriesAssociation ofAmerica, Inc. (AIA), 1000
DOI: 10.1520/E0751_E0751M-17R22. WilsonBlvd.,Suite1700,Arlington,VA22209-3928,http://www.aia-aerospace.org.
For referenced ASTM standards, visit the ASTM website, www.astm.org, or
contact ASTM Customer Service at service@astm.org. For Annual Book of ASTM Available from International Organization for Standardization (ISO), ISO
Standards volume information, refer to the standard’s Document Summary page on Central Secretariat, BIBC II, Chemin de Blandonnet 8, CP 401, 1214 Vernier,
the ASTM website. Geneva, Switzerland, http://www.iso.org.
Copyright © ASTM International, 100 Barr Harbor Drive, PO Box C700, West Conshohocken, PA 19428-2959. United States
E751/E751M − 17 (2022)
FIG. 1 Typical AE Response Signals During Resistance Spot Welding
4.2.1 During current flow, plastic deformation, nugget 6.2 Personnel Qualification:
expansion, friction, melting, and expulsions produce AE sig-
6.2.1 If specified in the contractual agreement, personnel
nals. The signals caused by expulsion (spitting or flashing, or performing examinations to this standard shall be qualified in
both) generally have large amplitudes and can be distinguished
accordance with a nationally or internationally recognized
from the rest of the acoustic emission associated with nugget NDT personnel qualification practice or standard such as
formation. Fig. 2 shows typical AE response signals during
ANSI/ASNT CP-189, SNT-TC-1A, NAS-410, ISO 9712, or a
current flow for both d-c and a-c welding. similar document and certified by the employer or certifying
4.2.2 Following termination of the welding current, some
agency, as applicable. The practice or standard used and its
materials exhibit appreciable AE during solidification which applicable revision shall be identified in the contractual agree-
can be related to nugget size and inclusions. As the nugget
ment between the using parties.
cools during the hold period, AE can result from solid-solid
6.3 Qualification of Nondestructive Agencies—If specified
phase transformations and cracking.
in the contractual agreement, NDT agencies shall be qualified
4.2.3 During the lift-off stage, separation of the electrode
and evaluated as described in Practice E543. The applicable
from the part produces signals that can be related to the
edition of Practice E543 shall be specified in the contractual
condition of the electrode as well as the cosmetic condition of
agreement.
the weld.
6.4 Procedures and Techniques—The procedures and tech-
4.3 Using time, and amplitude or energy discrimination, or
niques to be utilized shall be as specified in the contractual
both, the AE response corresponding to each stage can be
agreement.
separately detected and analyzed. Although the AE associated
with each stage of the spot-welding process can be relevant to
7. Ordering Information
weld quality, this practice only gives detailed consideration to
7.1 If the spot-weld monitoring or process control methods
the AE generated by nugget formation and expansion,
described in this practice are performed as a service, the
expulsion, and cracking.
following items should be addressed in the purchase
5. Significance and Use
specification, and are subject to agreement between the pur-
chaser and the supplier:
5.1 The AE produced during the production of a spot-weld
7.1.1 Description of the welded parts in terms of geometry,
can be related to weld quality parameters such as the strength
dimensions, number and position of welds, and materials.
and size of the nugget, the amount of expulsion, and the
amount of cracking. Therefore, in-process AE monitoring can 7.1.2 Description of the welding machine, type and dimen-
sions of the electrodes, type of weld controller, welding
be used both as an examination method, and as a means for
providing feedback control. schedule, and distance between the welding head and the
controller.
6. Basis of Application
7.1.3 Location and mounting method for the acoustic emis-
6.1 The following items are subject to contractual agree- sion sensors, and design of the mounting fixture, as appropri-
ment between the parties using or referencing this standard. ate.
E751/E751M − 17 (2022)
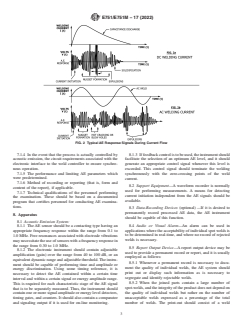
FIG. 2 Typical AE Response Signals During Current Flow
7.1.4 In the event that the process is actually controlled by 8.1.3 Iffeedbackcontrolistobeused,theinstrumentshould
acoustic emission, the circuit requirements associated with the facilitate the selection of an optimum AE level, and it should
electronic interface to the weld controller to ensure synchro- generate an appropriate control signal whenever this level is
nous operation.
exceeded. This control signal should terminate the welding
7.1.5 The performance and limiting AE parameters which
synchronously with the zero-crossing points of the weld
were predetermined.
current.
7.1.6 Method of recording or reporting (that is, form and
8.2 Support Equipment—A waveform recorder is normally
content of the report), if applicable.
used for performing measurements. A means for detecting
7.1.7 Technical qualifications of the personnel performing
current initiation independent from the AE signals should be
the examination. These should be based on a documented
available.
program that certifies personnel for conducting AE examina-
tions.
8.3 Data-Recording Devices (optional) —If it is desired to
permanently record processed AE data, the AE instrument
8. Apparatus
should be capable of this function.
8.1 Acoustic Emission System:
8.4 Audio or Visual Alarm—An alarm can be used in
8.1.1 The AE sensor should be a contacting type having an
applications where the acceptability of individual spot welds is
appropriate frequency response within the range from 0.1 to
to be determined in real-time, and where no record of rejected
1.0 MHz. Free resonances associated with electrode vibrations
welds is necessary.
maynecessitatetheuseofsensorswithafrequencyresponsein
the range from 0.30 to 1.0 MHz.
8.5 Report Output Device—A report output device may be
8.1.2 The electronic instrument should contain adjustable
used to provide a permanent record or report, and it is usually
amplification (gain) over the range from 40 to 100 dB, or an
employed as follows:
equivalent dynamic range and adjustable threshold.The instru-
8.5.1 Whenever a permanent record is necessary to docu-
ment should be capable of performing time and amplitude or
ment the quality of individual welds, the AE system should
energy discrimination. Using some timing reference, it is
print out or display such information as is necessary to
necessary to detect the AE contained within a certain time
segregate and identify rejectable welds.
interval and within a certain signal or energy amplitude range.
8.5.2 When the joined parts contain a large number of
This is required for each characteristic stage of the AE signal
spot-welds, and the integrity of the product does not depend on
that is to be separately measured. Thus, the instrument should
contain one or more signal amplitude or energy level detectors, the quality of individual welds but rather on the number of
unacceptable welds expressed as a percentage of the total
timing gates, and counters. It should also contain a comparator
and signaling output if it is used for on-line monitoring. number of welds. The print-out should consist of a weld
E751/E751M − 17 (2022)
sequence number and a running percentage of unacceptable considerations associated with each of the various examination
welds when the individual spot-welds are identifiable by parameters are discussed in 10.1 – 10.4.
sequence number.
9.2.2 Repeated Applications—If AE monitoring was previ-
8.5.3 If weld identification is not possible, then the welding
ouslyappliedtoaparticularcontrollingormonitoringproblem,
apparatus should be equipped with an automatic marking the purpose of the preliminary measurement is to reestablish
attachment. With the markings and the records, the acceptabil-
the known and recorded original test conditions. The heat and
ity of the welded part can be based on the percentage of
the weld time settings on the weld controller, and the gain,
unacceptable welds and their location distribution.
threshold level, timing, and other settings on the AE instru-
mentation should be made identical to those on record. A few
9. Procedure
sample welds should be made to verify that the general
appearance of the total AE signal exhibits the expected
9.1 Sensor and Preamplifier Attachment—The sensor
characteristic features, and that the average count falls within
should be mounted to the lower (grounded) electrode or
the range of past measurements.
electrode holder. If the measurements are to be made only as a
periodic sampling of weld quality, a liquid couplant may be
10. Weld Quality Parameters That Produce AE
used provided that it is periodically replenished and standard-
ization of the system response is maintained. For sustained
10.1 AE During Nugget Formation:
monitoring, such as on-lineAE examination or control of each
10.1.1 When the material in the welding zone is heated, the
nugget, the sensor should be permanently mounted using an
pressureappliedbythetopelectrodewillplasticallydeformthe
epoxy adhesive or a similar material. A preamplifier is usually
material and AE will be generated. The amplitude of the AE
positioned near the sensor. However, when the instrumentation
signals associated with this process is affected by both elec-
is located less than1m[3
...


Questions, Comments and Discussion
Ask us and Technical Secretary will try to provide an answer. You can facilitate discussion about the standard in here.
Loading comments...