ASTM E1245-03(2008)
(Practice)Standard Practice for Determining the Inclusion or Second-Phase Constituent Content of Metals by Automatic Image Analysis
Standard Practice for Determining the Inclusion or Second-Phase Constituent Content of Metals by Automatic Image Analysis
SIGNIFICANCE AND USE
This practice is used to assess the indigenous inclusions or second-phase constituents of metals using basic stereological procedures performed by automatic image analyzers.
This practice is not suitable for assessing the exogenous inclusions in steels and other metals. Because of the sporadic, unpredictable nature of the distribution of exogenous inclusions, other methods involving complete inspection, for example, ultrasonics, must be used to locate their presence. The exact nature of the exogenous material can then be determined by sectioning into the suspect region followed by serial, step-wise grinding to expose the exogenous matter for identification and individual measurement. Direct size measurement rather than application of stereological methods is employed.
Because the characteristics of the indigenous inclusion population vary within a given lot of material due to the influence of compositional fluctuations, solidification conditions and processing, the lot must be sampled statistically to assess its inclusion content. The largest lot sampled is the heat lot but smaller lots, for example, the product of an ingot, within the heat may be sampled as a separate lot. The sampling of a given lot must be adequate for the lot size and characteristics.
The practice is suitable for assessment of the indigenous inclusions in any steel (or other metal) product regardless of its size or shape as long as enough different fields can be measured to obtain reasonable statistical confidence in the data. Because the specifics of the manufacture of the product do influence the morphological characteristics of the inclusions, the report should state the relevant manufacturing details, that is, data regarding the deformation history of the product.
To compare the inclusion measurement results from different lots of the same or similar types of steels, or other metals, a standard sampling scheme should be adopted such as described in Practice E 45.
The test measureme...
SCOPE
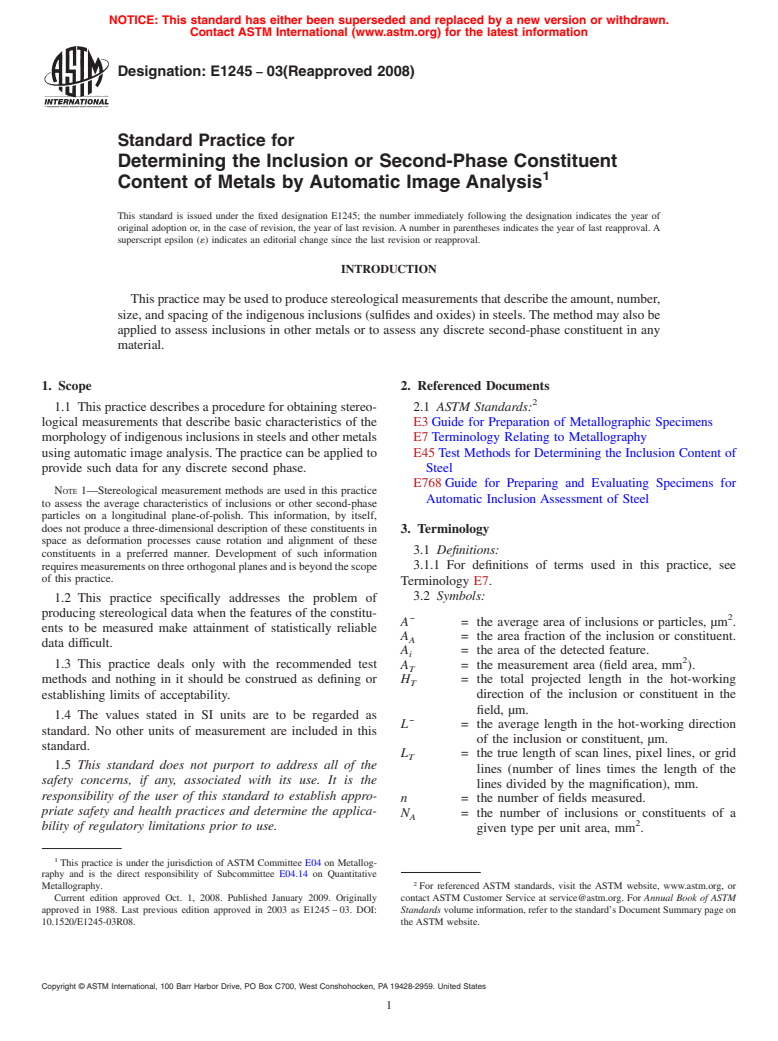
1.1 This practice describes a procedure for obtaining stereological measurements that describe basic characteristics of the morphology of indigenous inclusions in steels and other metals using automatic image analysis. The practice can be applied to provide such data for any discrete second phase.
Note 1—Stereological measurement methods are used in this practice to assess the average characteristics of inclusions or other second-phase particles on a longitudinal plane-of-polish. This information, by itself, does not produce a three-dimensional description of these constituents in space as deformation processes cause rotation and alignment of these constituents in a preferred manner. Development of such information requires measurements on three orthogonal planes and is beyond the scope of this practice.
1.2 This practice specifically addresses the problem of producing stereological data when the features of the constituents to be measured make attainment of statistically reliable data difficult.
1.3 This practice deals only with the recommended test methods and nothing in it should be construed as defining or establishing limits of acceptability.
1.4 The values stated in SI units are to be regarded as standard. No other units of measurement are included in this standard.
1.5 This standard does not purport to address all of the safety concerns, if any, associated with its use. It is the responsibility of the user of this standard to establish appropriate safety and health practices and determine the applicability of regulatory limitations prior to use.
General Information
Relations
Buy Standard
Standards Content (Sample)
NOTICE: This standard has either been superseded and replaced by a new version or withdrawn.
Contact ASTM International (www.astm.org) for the latest information
Designation: E1245 − 03(Reapproved 2008)
Standard Practice for
Determining the Inclusion or Second-Phase Constituent
1
Content of Metals by Automatic Image Analysis
This standard is issued under the fixed designation E1245; the number immediately following the designation indicates the year of
original adoption or, in the case of revision, the year of last revision.Anumber in parentheses indicates the year of last reapproval.A
superscript epsilon (´) indicates an editorial change since the last revision or reapproval.
INTRODUCTION
Thispracticemaybeusedtoproducestereologicalmeasurementsthatdescribetheamount,number,
size,andspacingoftheindigenousinclusions(sulfidesandoxides)insteels.Themethodmayalsobe
applied to assess inclusions in other metals or to assess any discrete second-phase constituent in any
material.
1. Scope 2. Referenced Documents
2
1.1 Thispracticedescribesaprocedureforobtainingstereo- 2.1 ASTM Standards:
logical measurements that describe basic characteristics of the E3Guide for Preparation of Metallographic Specimens
morphologyofindigenousinclusionsinsteelsandothermetals E7Terminology Relating to Metallography
using automatic image analysis.The practice can be applied to E45Test Methods for Determining the Inclusion Content of
provide such data for any discrete second phase. Steel
E768Guide for Preparing and Evaluating Specimens for
NOTE 1—Stereological measurement methods are used in this practice
Automatic Inclusion Assessment of Steel
to assess the average characteristics of inclusions or other second-phase
particles on a longitudinal plane-of-polish. This information, by itself,
does not produce a three-dimensional description of these constituents in
3. Terminology
space as deformation processes cause rotation and alignment of these
3.1 Definitions:
constituents in a preferred manner. Development of such information
requiresmeasurementsonthreeorthogonalplanesandisbeyondthescope 3.1.1 For definitions of terms used in this practice, see
of this practice.
Terminology E7.
3.2 Symbols:
1.2 This practice specifically addresses the problem of
producing stereological data when the features of the constitu-
2
A¯ = the average area of inclusions or particles, µm .
ents to be measured make attainment of statistically reliable
A = the area fraction of the inclusion or constituent.
A
data difficult.
A = the area of the detected feature.
i
2
1.3 This practice deals only with the recommended test
A = the measurement area (field area, mm ).
T
H = the total projected length in the hot-working
methods and nothing in it should be construed as defining or
T
establishing limits of acceptability. direction of the inclusion or constituent in the
field, µm.
1.4 The values stated in SI units are to be regarded as
L¯ = the average length in the hot-working direction
standard. No other units of measurement are included in this
of the inclusion or constituent, µm.
standard.
L = the true length of scan lines, pixel lines, or grid
T
1.5 This standard does not purport to address all of the
lines (number of lines times the length of the
safety concerns, if any, associated with its use. It is the
lines divided by the magnification), mm.
responsibility of the user of this standard to establish appro-
n = the number of fields measured.
priate safety and health practices and determine the applica-
N = the number of inclusions or constituents of a
A
2
bility of regulatory limitations prior to use.
given type per unit area, mm .
1
This practice is under the jurisdiction of ASTM Committee E04 on Metallog-
raphy and is the direct responsibility of Subcommittee E04.14 on Quantitative
2
Metallography. For referenced ASTM standards, visit the ASTM website, www.astm.org, or
Current edition approved Oct. 1, 2008. Published January 2009. Originally contact ASTM Customer Service at service@astm.org. For Annual Book of ASTM
approved in 1988. Last previous edition approved in 2003 as E1245–03. DOI: Standards volume information, refer to the standard’s Document Summary page on
10.1520/E1245-03R08. the ASTM website.
Copyright © ASTM International, 100 Barr Harbor Drive, PO Box C700, West Conshohocken, PA 19428-2959. United States
1
---------------------- Page: 1 ----------------------
E1245 − 03 (2008)
identification and individual measurement. Direct size mea-
N = the number of inclusions or constituent particles
i
surement rather than application of stereological methods is
or the number of feature interceptions, in the
employed.
field.
N = the number of interceptions of inclusions or
L
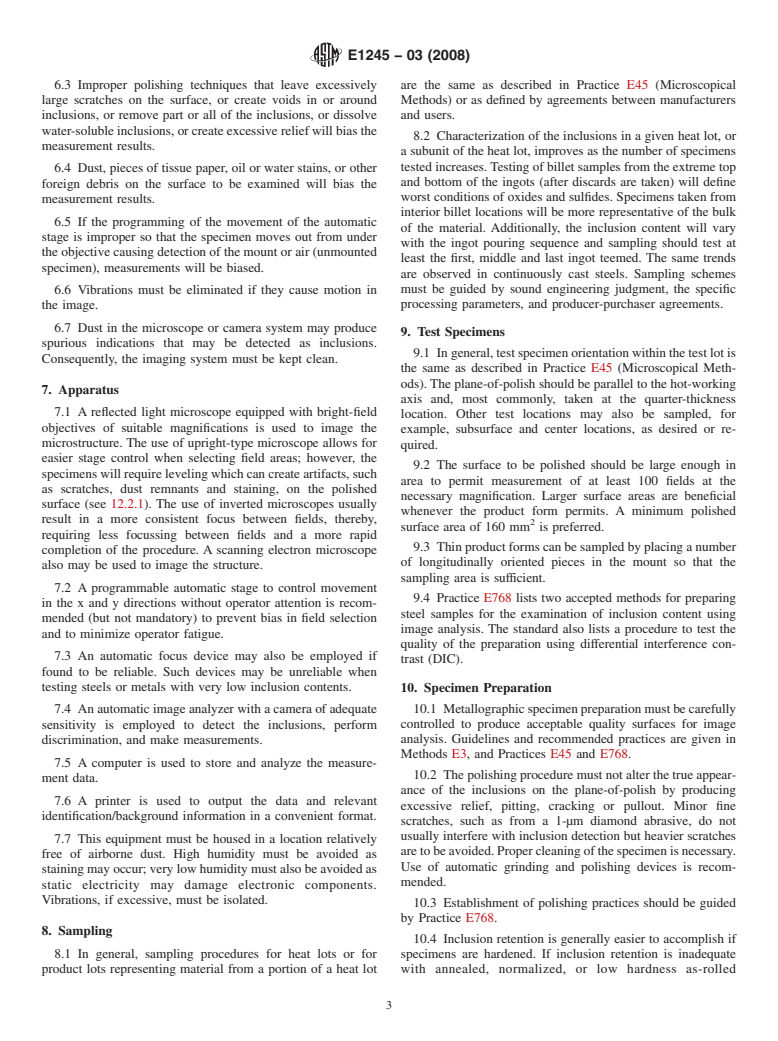
5.3 Because the characteristics of the indigenous inclusion
constituentparticlesperunitlength(mm)ofscan
population vary within a given lot of material due to the
lines, pixel lines, or grid lines.
influence of compositional fluctuations, solidification condi-
PP = the number of detected picture points.
i
...
This document is not anASTM standard and is intended only to provide the user of anASTM standard an indication of what changes have been made to the previous version. Because
it may not be technically possible to adequately depict all changes accurately, ASTM recommends that users consult prior editions as appropriate. In all cases only the current version
of the standard as published by ASTM is to be considered the official document.
Designation:E1245–00 Designation: E 1245 – 03 (Reapproved 2008)
Standard Practice for
Determining the Inclusion or Second-Phase Constituent
1
Content of Metals by Automatic Image Analysis
This standard is issued under the fixed designation E1245; the number immediately following the designation indicates the year of
original adoption or, in the case of revision, the year of last revision.Anumber in parentheses indicates the year of last reapproval.A
superscript epsilon (´) indicates an editorial change since the last revision or reapproval.
INTRODUCTION
Thispracticemaybeusedtoproducestereologicalmeasurementsthatdescribetheamount,number,
size,andspacingoftheindigenousinclusions(sulfidesandoxides)insteels.Themethodmayalsobe
applied to assess inclusions in other metals or to assess any discrete second-phase constituent in any
material.
1. Scope
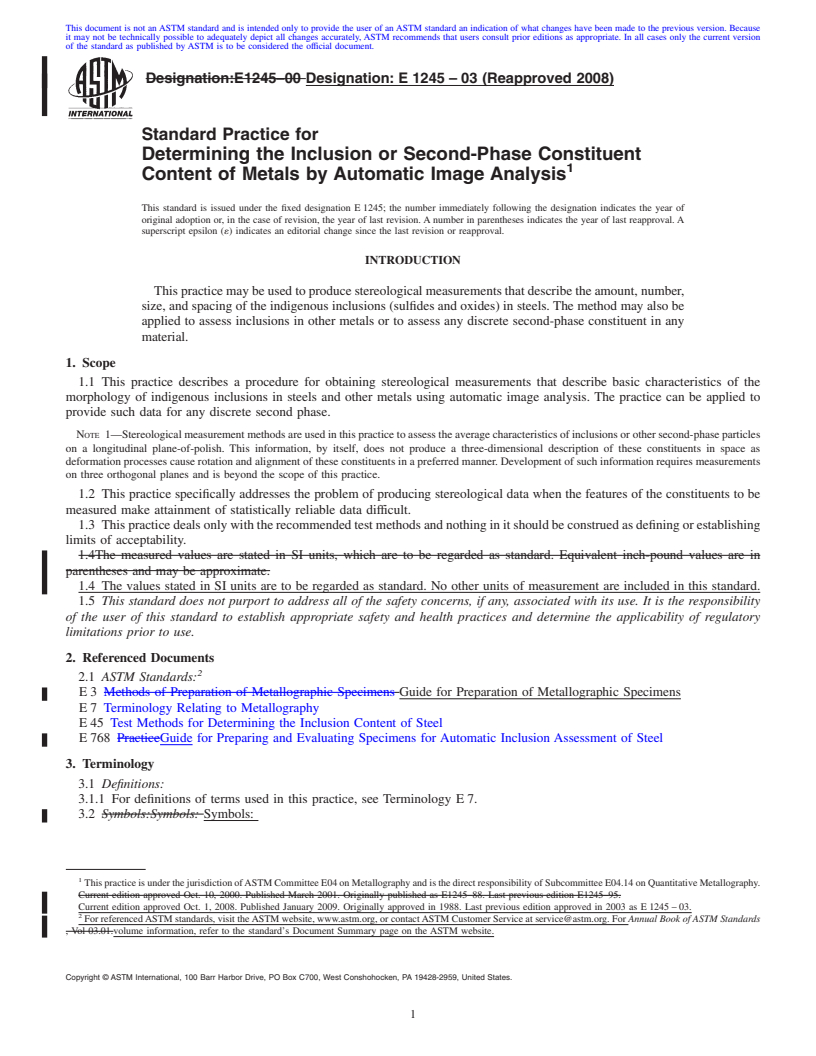
1.1 This practice describes a procedure for obtaining stereological measurements that describe basic characteristics of the
morphology of indigenous inclusions in steels and other metals using automatic image analysis. The practice can be applied to
provide such data for any discrete second phase.
NOTE 1—Stereologicalmeasurementmethodsareusedinthispracticetoassesstheaveragecharacteristicsofinclusionsorothersecond-phaseparticles
on a longitudinal plane-of-polish. This information, by itself, does not produce a three-dimensional description of these constituents in space as
deformationprocessescauserotationandalignmentoftheseconstituentsinapreferredmanner.Developmentofsuchinformationrequiresmeasurements
on three orthogonal planes and is beyond the scope of this practice.
1.2 This practice specifically addresses the problem of producing stereological data when the features of the constituents to be
measured make attainment of statistically reliable data difficult.
1.3 Thispracticedealsonlywiththerecommendedtestmethodsandnothinginitshouldbeconstruedasdefiningorestablishing
limits of acceptability.
1.4The measured values are stated in SI units, which are to be regarded as standard. Equivalent inch-pound values are in
parentheses and may be approximate.
1.4 The values stated in SI units are to be regarded as standard. No other units of measurement are included in this standard.
1.5 This standard does not purport to address all of the safety concerns, if any, associated with its use. It is the responsibility
of the user of this standard to establish appropriate safety and health practices and determine the applicability of regulatory
limitations prior to use.
2. Referenced Documents
2
2.1 ASTM Standards:
E3 Methods of Preparation of Metallographic Specimens Guide for Preparation of Metallographic Specimens
E7 Terminology Relating to Metallography
E45 Test Methods for Determining the Inclusion Content of Steel
E768 PracticeGuide for Preparing and Evaluating Specimens for Automatic Inclusion Assessment of Steel
3. Terminology
3.1 Definitions:
3.1.1 For definitions of terms used in this practice, see Terminology E7.
3.2 Symbols:Symbols: Symbols:
1
ThispracticeisunderthejurisdictionofASTMCommitteeE04onMetallographyandisthedirectresponsibilityofSubcommitteeE04.14onQuantitativeMetallography.
Current edition approved Oct. 10, 2000. Published March 2001. Originally published as E1245–88. Last previous edition E1245–95.
Current edition approved Oct. 1, 2008. Published January 2009. Originally approved in 1988. Last previous edition approved in 2003 as E1245–03.
2
ForreferencedASTMstandards,visittheASTMwebsite,www.astm.org,orcontactASTMCustomerServiceatservice@astm.org.For Annual Book of ASTM Standards
, Vol 03.01.volume information, refer to the standard’s Document Summary page on the ASTM website.
Copyright © ASTM International, 100 Barr Harbor Drive, PO Box C700, West Conshohocken, PA 19428-2959, United States.
1
---------------------- Page: 1 ----------------------
E 1245 – 03 (2008)
2
¯
A = the average area of inclusions or particles, µm .
A = the area fraction of the inclusion or constituent.
A
A = the area of the detected feature.
i
2
A = the measurement area (field area, mm ).
T
H = the total projected length in the hot-working direction of the inclusion or constituent in the field, µm.
T
¯
L = the average length in the hot-working direction of the inclusion or constituent, µm.
L = the true length of scan lines, pixel lines, or grid lines (number of lines times the length of the lines divided by the
T
magnification), mm.
n = the number of fields measured.
2
N = the number of inclusions or constituents of a given type per unit area, mm .
A
N = the number
...
This document is not anASTM standard and is intended only to provide the user of anASTM standard an indication of what changes have been made to the previous version. Because
it may not be technically possible to adequately depict all changes accurately, ASTM recommends that users consult prior editions as appropriate. In all cases only the current version
of the standard as published by ASTM is to be considered the official document.
Designation:E1245–03 Designation: E 1245 – 03 (Reapproved 2008)
Standard Practice for
Determining the Inclusion or Second-Phase Constituent
1
Content of Metals by Automatic Image Analysis
This standard is issued under the fixed designation E 1245; the number immediately following the designation indicates the year of
original adoption or, in the case of revision, the year of last revision. A number in parentheses indicates the year of last reapproval. A
superscript epsilon (´) indicates an editorial change since the last revision or reapproval.
INTRODUCTION
Thispracticemaybeusedtoproducestereologicalmeasurementsthatdescribetheamount,number,
size, and spacing of the indigenous inclusions (sulfides and oxides) in steels. The method may also be
applied to assess inclusions in other metals or to assess any discrete second-phase constituent in any
material.
1. Scope
1.1 This practice describes a procedure for obtaining stereological measurements that describe basic characteristics of the
morphology of indigenous inclusions in steels and other metals using automatic image analysis. The practice can be applied to
provide such data for any discrete second phase.
NOTE 1—Stereologicalmeasurementmethodsareusedinthispracticetoassesstheaveragecharacteristicsofinclusionsorothersecond-phaseparticles
on a longitudinal plane-of-polish. This information, by itself, does not produce a three-dimensional description of these constituents in space as
deformation processes cause rotation and alignment of these constituents in a preferred manner. Development of such information requires measurements
on three orthogonal planes and is beyond the scope of this practice.
1.2 This practice specifically addresses the problem of producing stereological data when the features of the constituents to be
measured make attainment of statistically reliable data difficult.
1.3 Thispracticedealsonlywiththerecommendedtestmethodsandnothinginitshouldbeconstruedasdefiningorestablishing
limits of acceptability.
1.4The measured values are stated in SI units, which are to be regarded as standard. Equivalent inch-pound values are in
parentheses and may be approximate.
1.4 The values stated in SI units are to be regarded as standard. No other units of measurement are included in this standard.
1.5 This standard does not purport to address all of the safety concerns, if any, associated with its use. It is the responsibility
of the user of this standard to establish appropriate safety and health practices and determine the applicability of regulatory
limitations prior to use.
2. Referenced Documents
2
2.1 ASTM Standards:
E3 Methods of Preparation of Metallographic Specimens Guide for Preparation of Metallographic Specimens
E7 Terminology Relating to Metallography
E45 Test Methods for Determining the Inclusion Content of Steel
E 768 PracticeGuide for Preparing and Evaluating Specimens for Automatic Inclusion Assessment of Steel
3. Terminology
3.1 Definitions:
3.1.1 For definitions of terms used in this practice, see Terminology E 7.
3.2 Symbols:
1
ThispracticeisunderthejurisdictionofASTMCommitteeE04onMetallographyandisthedirectresponsibilityofSubcommitteeE04.14onQuantitativeMetallography.
Current edition approved Jan. 10, 2003. Published April 2003. Originally approved in 1988. Last previous edition approved in 2000 as E1245–00.
Current edition approved Oct. 1, 2008. Published January 2009. Originally approved in 1988. Last previous edition approved in 2003 as E 1245 – 03.
2
For referencedASTM standards, visit theASTM website, www.astm.org, or contactASTM Customer Service at service@astm.org. For Annual Book of ASTM Standards
, Vol 03.01.volume information, refer to the standard’s Document Summary page on the ASTM website.
Copyright © ASTM International, 100 Barr Harbor Drive, PO Box C700, West Conshohocken, PA 19428-2959, United States.
1
---------------------- Page: 1 ----------------------
E 1245 – 03 (2008)
2
¯
A = the average area of inclusions or particles, µm .
A = the area fraction of the inclusion or constituent.
A
A = the area of the detected feature.
i
2
A = the measurement area (field area, mm ).
T
H = the total projected length in the hot-working direction of the inclusion or constituent in the field, µm.
T
¯
L = the average length in the hot-working direction of the inclusion or constituent, µm.
L = the true length of scan lines, pixel lines, or grid lines (number of lines times the length of the lines divided by the
T
magnification), mm.
n = the number of fields measured.
2
N = the number of inclusions or constituent
...



Questions, Comments and Discussion
Ask us and Technical Secretary will try to provide an answer. You can facilitate discussion about the standard in here.