ASTM E29-08
(Practice)Standard Practice for Using Significant Digits in Test Data to Determine Conformance with Specifications
Standard Practice for Using Significant Digits in Test Data to Determine Conformance with Specifications
ABSTRACT
This practice is intended to assist the various technical committees in the use of uniform methods of indicating the number of digits which are to be considered significant in specification limits, for example, specified maximum values and specified minimum values. Its aim is to outline methods which should aid in clarifying the intended meaning of specification limits with which observed values or calculated test results are compared in determining conformance with specifications. Two commonly accepted methods of rounding data, identified as the absolute method and the rounding method are described. The guidelines for retaining significant figures in calculation and reporting of test results are presented in details.
SCOPE
1.1 This practice is intended to assist the various technical committees in the use of uniform methods of indicating the number of digits which are to be considered significant in specification limits, for example, specified maximum values and specified minimum values. Its aim is to outline methods which should aid in clarifying the intended meaning of specification limits with which observed values or calculated test results are compared in determining conformance with specifications.
1.2 This practice is intended to be used in determining conformance with specifications when the applicable ASTM specifications or standards make direct reference to this practice.
1.3 Reference to this practice is valid only when a choice of method has been indicated, that is, either absolute method or rounding method.
General Information
Relations
Buy Standard
Standards Content (Sample)
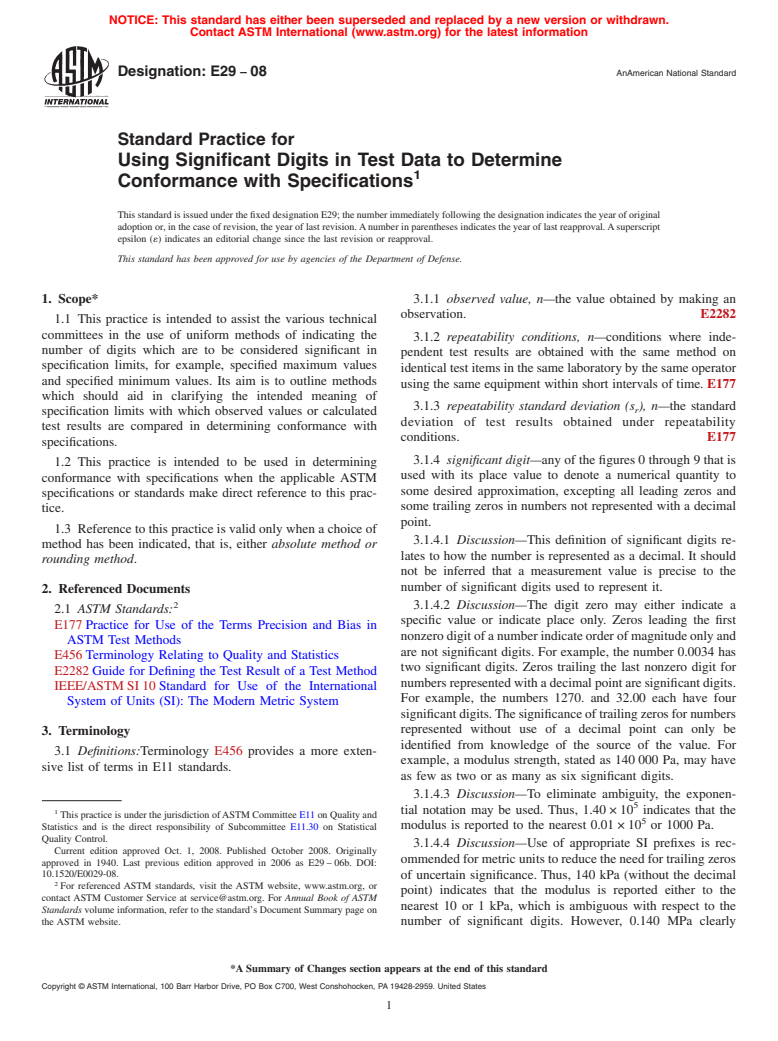
NOTICE: This standard has either been superseded and replaced by a new version or withdrawn.
Contact ASTM International (www.astm.org) for the latest information
Designation:E29 −08 AnAmerican National Standard
Standard Practice for
Using Significant Digits in Test Data to Determine
1
Conformance with Specifications
ThisstandardisissuedunderthefixeddesignationE29;thenumberimmediatelyfollowingthedesignationindicatestheyearoforiginal
adoptionor,inthecaseofrevision,theyearoflastrevision.Anumberinparenthesesindicatestheyearoflastreapproval.Asuperscript
epsilon (´) indicates an editorial change since the last revision or reapproval.
This standard has been approved for use by agencies of the Department of Defense.
1. Scope* 3.1.1 observed value, n—the value obtained by making an
observation. E2282
1.1 This practice is intended to assist the various technical
committees in the use of uniform methods of indicating the
3.1.2 repeatability conditions, n—conditions where inde-
number of digits which are to be considered significant in
pendent test results are obtained with the same method on
specification limits, for example, specified maximum values
identicaltestitemsinthesamelaboratorybythesameoperator
and specified minimum values. Its aim is to outline methods
using the same equipment within short intervals of time. E177
which should aid in clarifying the intended meaning of
3.1.3 repeatability standard deviation (s ), n—the standard
r
specification limits with which observed values or calculated
deviation of test results obtained under repeatability
test results are compared in determining conformance with
conditions. E177
specifications.
3.1.4 significant digit—any of the figures 0 through 9 that is
1.2 This practice is intended to be used in determining
used with its place value to denote a numerical quantity to
conformance with specifications when the applicable ASTM
some desired approximation, excepting all leading zeros and
specifications or standards make direct reference to this prac-
some trailing zeros in numbers not represented with a decimal
tice.
point.
1.3 Referencetothispracticeisvalidonlywhenachoiceof
3.1.4.1 Discussion—This definition of significant digits re-
method has been indicated, that is, either absolute method or
lates to how the number is represented as a decimal. It should
rounding method.
not be inferred that a measurement value is precise to the
number of significant digits used to represent it.
2. Referenced Documents
2
3.1.4.2 Discussion—The digit zero may either indicate a
2.1 ASTM Standards:
specific value or indicate place only. Zeros leading the first
E177Practice for Use of the Terms Precision and Bias in
nonzerodigitofanumberindicateorderofmagnitudeonlyand
ASTM Test Methods
are not significant digits. For example, the number 0.0034 has
E456Terminology Relating to Quality and Statistics
two significant digits. Zeros trailing the last nonzero digit for
E2282Guide for Defining the Test Result of a Test Method
numbersrepresentedwithadecimalpointaresignificantdigits.
IEEE/ASTMSI10Standard for Use of the International
For example, the numbers 1270. and 32.00 each have four
System of Units (SI): The Modern Metric System
significantdigits.Thesignificanceoftrailingzerosfornumbers
represented without use of a decimal point can only be
3. Terminology
identified from knowledge of the source of the value. For
3.1 Definitions:Terminology E456 provides a more exten-
example, a modulus strength, stated as 140000 Pa, may have
sive list of terms in E11 standards.
as few as two or as many as six significant digits.
3.1.4.3 Discussion—To eliminate ambiguity, the exponen-
5
tial notation may be used. Thus, 1.40×10 indicates that the
1
ThispracticeisunderthejurisdictionofASTMCommitteeE11onQualityand
5
Statistics and is the direct responsibility of Subcommittee E11.30 on Statistical modulus is reported to the nearest 0.01×10 or 1000 Pa.
Quality Control.
3.1.4.4 Discussion—Use of appropriate SI prefixes is rec-
Current edition approved Oct. 1, 2008. Published October 2008. Originally
ommendedformetricunitstoreducetheneedfortrailingzeros
approved in 1940. Last previous edition approved in 2006 as E29–06b. DOI:
10.1520/E0029-08.
of uncertain significance. Thus, 140 kPa (without the decimal
2
For referenced ASTM standards, visit the ASTM website, www.astm.org, or
point) indicates that the modulus is reported either to the
contact ASTM Customer Service at service@astm.org. For Annual Book of ASTM
nearest 10 or 1 kPa, which is ambiguous with respect to the
Standards volume information, refer to the standard’s Document Summary page on
the ASTM website. number of significant digits. However, 0.140 MPa clearly
*A Summary of Changes section appears at the end of this standard
Copyright © ASTM International, 100 Barr Harbor Drive, PO Box C700, West Conshohocken, PA 19428-2959. United States
1
---------------------- Page: 1 ----------------------
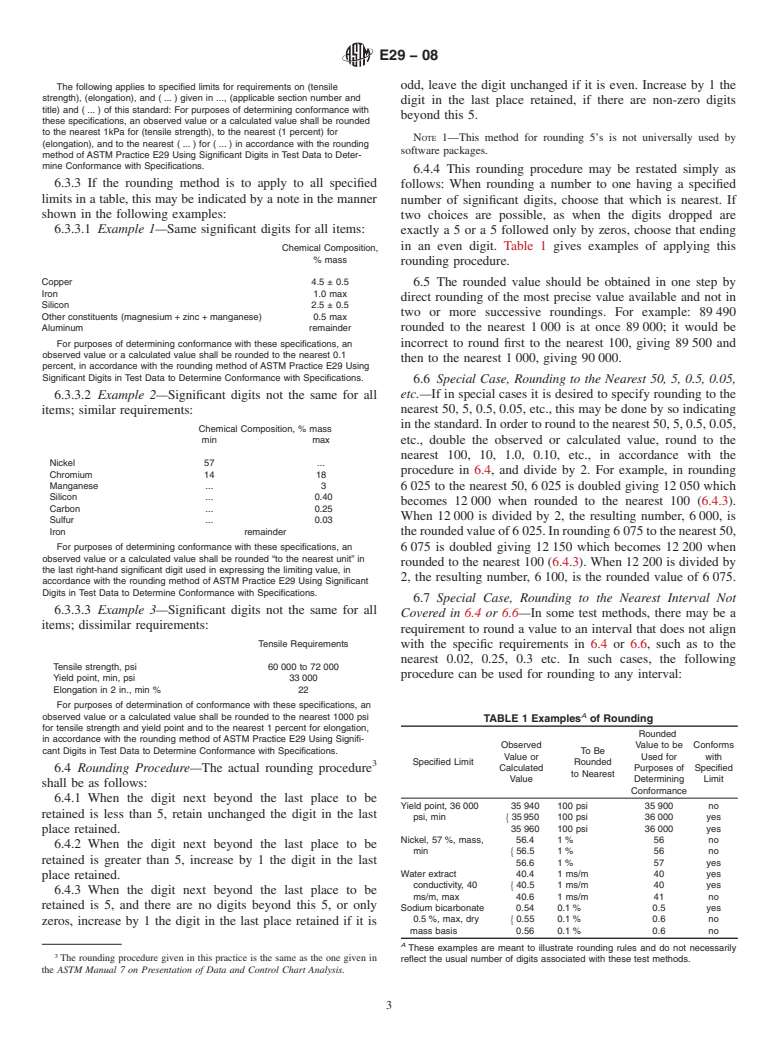
E29−08
indicates that the modulus is reported to the nearest 1 kPa, and 5.3 How Expressed—Th
...
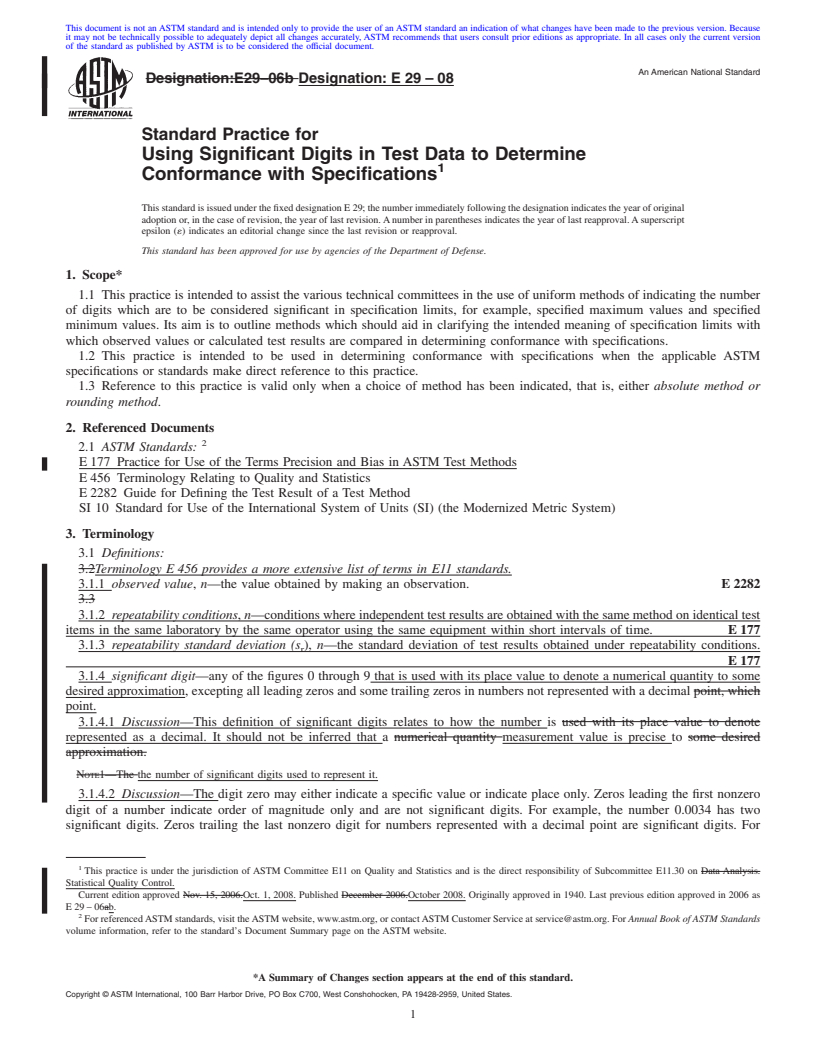
This document is not an ASTM standard and is intended only to provide the user of an ASTM standard an indication of what changes have been made to the previous version. Because
it may not be technically possible to adequately depict all changes accurately, ASTM recommends that users consult prior editions as appropriate. In all cases only the current version
of the standard as published by ASTM is to be considered the official document.
An American National Standard
Designation:E29–06b Designation: E 29 – 08
Standard Practice for
Using Significant Digits in Test Data to Determine
1
Conformance with Specifications
ThisstandardisissuedunderthefixeddesignationE 29;thenumberimmediatelyfollowingthedesignationindicatestheyearoforiginal
adoption or, in the case of revision, the year of last revision.Anumber in parentheses indicates the year of last reapproval.Asuperscript
epsilon (´) indicates an editorial change since the last revision or reapproval.
This standard has been approved for use by agencies of the Department of Defense.
1. Scope*
1.1 This practice is intended to assist the various technical committees in the use of uniform methods of indicating the number
of digits which are to be considered significant in specification limits, for example, specified maximum values and specified
minimum values. Its aim is to outline methods which should aid in clarifying the intended meaning of specification limits with
which observed values or calculated test results are compared in determining conformance with specifications.
1.2 This practice is intended to be used in determining conformance with specifications when the applicable ASTM
specifications or standards make direct reference to this practice.
1.3 Reference to this practice is valid only when a choice of method has been indicated, that is, either absolute method or
rounding method.
2. Referenced Documents
2
2.1 ASTM Standards:
E 177 Practice for Use of the Terms Precision and Bias in ASTM Test Methods
E 456 Terminology Relating to Quality and Statistics
E 2282 Guide for Defining the Test Result of a Test Method
SI 10 Standard for Use of the International System of Units (SI) (the Modernized Metric System)
3. Terminology
3.1 Definitions:
3.2Terminology E 456 provides a more extensive list of terms in E11 standards.
3.1.1 observed value, n—the value obtained by making an observation. E 2282
3.3
3.1.2 repeatability conditions, n—conditions where independent test results are obtained with the same method on identical test
items in the same laboratory by the same operator using the same equipment within short intervals of time. E 177
3.1.3 repeatability standard deviation (s ), n—the standard deviation of test results obtained under repeatability conditions.
r
E 177
3.1.4 significant digit—any of the figures 0 through 9 that is used with its place value to denote a numerical quantity to some
desired approximation, excepting all leading zeros and some trailing zeros in numbers not represented with a decimal point, which
point.
3.1.4.1 Discussion—This definition of significant digits relates to how the number is used with its place value to denote
represented as a decimal. It should not be inferred that a numerical quantity measurement value is precise to some desired
approximation.
NOTE1—The the number of significant digits used to represent it.
3.1.4.2 Discussion—The digit zero may either indicate a specific value or indicate place only. Zeros leading the first nonzero
digit of a number indicate order of magnitude only and are not significant digits. For example, the number 0.0034 has two
significant digits. Zeros trailing the last nonzero digit for numbers represented with a decimal point are significant digits. For
1
This practice is under the jurisdiction of ASTM Committee E11 on Quality and Statistics and is the direct responsibility of Subcommittee E11.30 on Data Analysis.
Statistical Quality Control.
Current edition approved Nov. 15, 2006.Oct. 1, 2008. Published December 2006.October 2008. Originally approved in 1940. Last previous edition approved in 2006 as
E 29 – 06ab.
2
For referencedASTM standards, visit theASTM website, www.astm.org, or contactASTM Customer Service at service@astm.org. For Annual Book of ASTM Standards
volume information, refer to the standard’s Document Summary page on the ASTM website.
*A Summary of Changes section appears at the end of this standard.
Copyright © ASTM International, 100 Barr Harbor Drive, PO Box C700, West Conshohocken, PA 19428-2959, United States.
1
---------------------- Page: 1 ----------------------
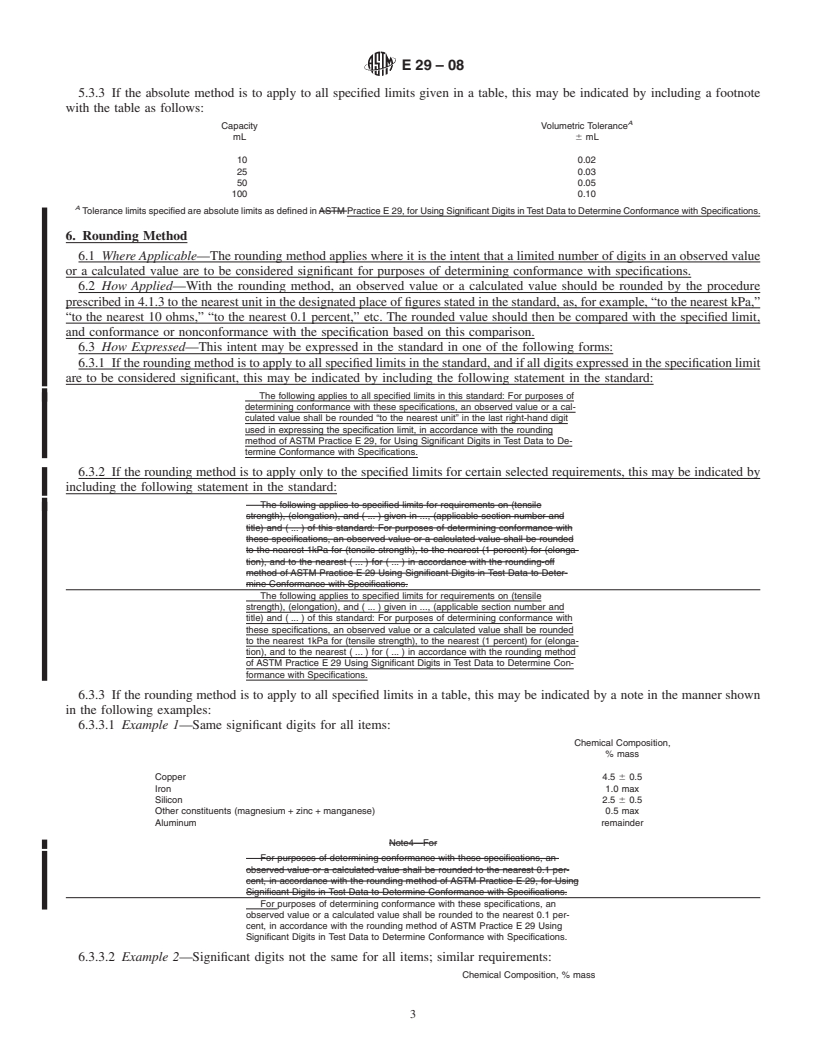
E29–08
example, the numbers 1270. and 32.00 each have four significant digits.The significance of trailing zeros for numbers represented
without use of a decimal point can only be identified from knowledge of the source of the value. For example, a modulus strength,
stated as 140 000 Pa, may have as few as two or as many as six significant digits. Note2—To
5
3.1.4.3 Discussion—Toeliminateambiguity,theexponentialnotationmaybeused.Thus,1.
...


Questions, Comments and Discussion
Ask us and Technical Secretary will try to provide an answer. You can facilitate discussion about the standard in here.