ASTM A126-04(2019)
(Specification)Standard Specification for Gray Iron Castings for Valves, Flanges, and Pipe Fittings
Standard Specification for Gray Iron Castings for Valves, Flanges, and Pipe Fittings
ABSTRACT
This guide covers standard specification for three classes of gray iron for castings intended for use as valve pressure retaining parts, pipe fittings, and flanges. Chemical analysis shall be performed in each lot and shall conform to the required chemical composition for phosphorous and sulfur. Tension test shall be conducted on each class of gray iron castings and shall conform to the specified values of tensile strength. Tension test specimens shall have threaded ends and shall conform to the prescribed dimensions.
SCOPE
1.1 This specification covers three classes of gray iron for castings intended for use as valve pressure-retaining parts, pipe fittings, and flanges.
1.2 The values stated in inch-pound units are to be regarded as standard. The values given in parentheses are mathematical conversions to SI units that are provided for information only and are not considered standard.
Note 1: The text of this standard references notes and footnotes which provide explanatory material. These notes and footnotes (excluding those in tables and figures) shall not be considered as requirements of the standard.
1.3 This international standard was developed in accordance with internationally recognized principles on standardization established in the Decision on Principles for the Development of International Standards, Guides and Recommendations issued by the World Trade Organization Technical Barriers to Trade (TBT) Committee.
General Information
Relations
Buy Standard
Standards Content (Sample)
This international standard was developed in accordance with internationally recognized principles on standardization established in the Decision on Principles for the
Development of International Standards, Guides and Recommendations issued by the World Trade Organization Technical Barriers to Trade (TBT) Committee.
Designation: A126 −04 (Reapproved 2019)
Standard Specification for
Gray Iron Castings for Valves, Flanges, and Pipe Fittings
This standard is issued under the fixed designation A126; the number immediately following the designation indicates the year of
original adoption or, in the case of revision, the year of last revision. A number in parentheses indicates the year of last reapproval. A
superscript epsilon (´) indicates an editorial change since the last revision or reapproval.
This standard has been approved for use by agencies of the U.S. Department of Defense.
1. Scope 5. Ordering Information
1.1 This specification covers three classes of gray iron for 5.1 Orders for material in this specification should include
castings intended for use as valve pressure-retaining parts, pipe
the following information:
fittings, and flanges. 5.1.1 ASTM designation and year date,
5.1.2 Class of iron required,
1.2 The values stated in inch-pound units are to be regarded
5.1.3 Quantity, and
as standard. The values given in parentheses are mathematical
5.1.4 Certification, if required (see Section 16).
conversions to SI units that are provided for information only
and are not considered standard.
6. Workmanship, Finish, and Appearance
NOTE 1—The text of this standard references notes and footnotes which
6.1 The castings shall be made in a workmanlike manner
provide explanatory material. These notes and footnotes (excluding those
in tables and figures) shall not be considered as requirements of the and the surface shall be free of adhering sand, scale, cracks,
standard.
and hot tears as determined by visual examination.
1.3 This international standard was developed in accor-
dance with internationally recognized principles on standard- 7. Chemical Requirements
ization established in the Decision on Principles for the
7.1 A chemical analysis shall be performed on each lot and
Development of International Standards, Guides and Recom-
shall conform to the following requirements for phosphorus
mendations issued by the World Trade Organization Technical
and sulfur:
Barriers to Trade (TBT) Committee.
Phosphorus, max, % 0.75
Sulfur, max, % 0.15
2. Referenced Documents
2 7.2 The chemical analysis shall be performed on a sample
2.1 ASTM Standards:
obtained during the pouring of the lot.
A48/A48M Specification for Gray Iron Castings
A644 Terminology Relating to Iron Castings
8. Tensile Properties
E8/E8M Test Methods for Tension Testing of Metallic Ma-
8.1 Onetensiontestshallbeperformedoneachlotandshall
terials
conform to the mechanical properties specified in Table 1.
3. Terminology
3.1 Definitions of many terms common to gray iron castings 9. Cast Test Bars
are found in Terminology A644.
9.1 Separately cast 1 ⁄8-in. (28.6-mm) diameter test bars
shown in Fig. 1 shall be poured in sand molds from the same
4. Classification
lot as the castings represented.
4.1 Castings produced to this specification are classified
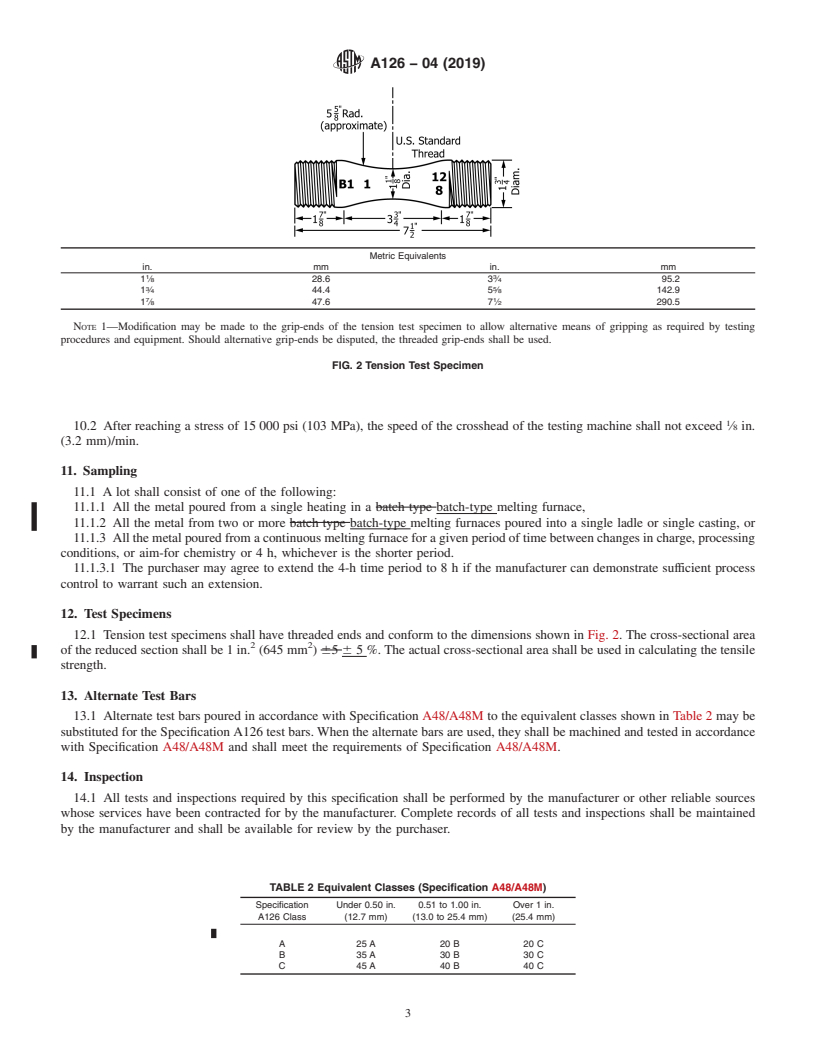
NOTE 2—The numbering on the test specimens shown in Figs. 1 and 2
based upon the minimum tensile strength of the iron (see Table
is intended simply to illustrate a method of designation. In the particular
1).
method shown refers to December 8, B1 is the cupola number, and the
numeral 1 which follows shows the hour cast (1 p.m.).
This specification is under the jurisdiction of ASTM Committee A04 on Iron
9.2 Test bars that are intended to represent castings which
CastingsandisthedirectresponsibilityofSubcommitteeA04.01onGreyandWhite
Iron Castings.
are cooled in the mold to less than 900 °F (480 °C) before
Current edition approved Nov. 1, 2019. Published November 2019. Originally
shakeout, shall be cooled in their molds to a temperature less
approved in 1929. Last previous edition approved in 2014 as A126 – 04 (2014).
than 900 °F, and then may be cooled in still air to room
DOI: 10.1520/A0126-04R19.
For referenced ASTM standards, visit the ASTM website, www.astm.org, or temperature.
contact ASTM Customer Service at service@astm.org. For Annual Book of ASTM
9.3 Test bars that are intended to represent castings which
Standards volume information, refer to the standard’s Document Summary page on
the ASTM website. are hotter than 900 °F when shaken out of their molds, shall be
Copyright © ASTM International, 100 Barr Harbor Drive, PO Box C700, West Conshohocken, PA 19428-2959. United States
A126 − 04 (2019)
Metric Equivalents
1 1 1 3 7 1 9 1 3 3
in. ⁄8 ⁄4 ⁄2 ⁄4 ⁄8 1 ⁄8 1.2 1 ⁄32 1 ⁄2 1 ⁄4 2 ⁄4 13
mm 3.2 6.4 12.7 19.0 22.2 28.6 30.5 32.5 38.1 44.4 69.8 1330
NOTE 1—These dimensions are suggested as satisfactory for average conditions, but may be varied to best suit individual pouring.
FIG. 1 Mold of Tension and Transverse Test Specimens
Metric Equivalents
in. mm in. mm
1 3
1 ⁄8 28.6 3 ⁄4 95.2
3 5
1 ⁄4 44.4 5 ⁄8 142.9
7 1
1 ⁄8 47.6 7 ⁄2 290.5
NOTE 1—Modification may be made to the grip-ends of the tension test specimen to allow alternative means of gripping as required by testing
procedures and equipment. Should alternative grip-ends be disputed, the threaded grip-ends shall be used.
...
NOTICE: This standard has either been superseded and replaced by a new version or withdrawn.
Contact ASTM International (www.astm.org) for the latest information
Designation: A126 − 04 (Reapproved 2019)
Standard Specification for
Gray Iron Castings for Valves, Flanges, and Pipe Fittings
This standard is issued under the fixed designation A126; the number immediately following the designation indicates the year of
original adoption or, in the case of revision, the year of last revision. A number in parentheses indicates the year of last reapproval. A
superscript epsilon (´) indicates an editorial change since the last revision or reapproval.
This standard has been approved for use by agencies of the U.S. Department of Defense.
1. Scope 5. Ordering Information
1.1 This specification covers three classes of gray iron for
5.1 Orders for material in this specification should include
castings intended for use as valve pressure-retaining parts, pipe the following information:
fittings, and flanges.
5.1.1 ASTM designation and year date,
5.1.2 Class of iron required,
1.2 The values stated in inch-pound units are to be regarded
5.1.3 Quantity, and
as standard. The values given in parentheses are mathematical
5.1.4 Certification, if required (see Section 16).
conversions to SI units that are provided for information only
and are not considered standard.
6. Workmanship, Finish, and Appearance
NOTE 1—The text of this standard references notes and footnotes which
6.1 The castings shall be made in a workmanlike manner
provide explanatory material. These notes and footnotes (excluding those
in tables and figures) shall not be considered as requirements of the and the surface shall be free of adhering sand, scale, cracks,
standard.
and hot tears as determined by visual examination.
1.3 This international standard was developed in accor-
dance with internationally recognized principles on standard- 7. Chemical Requirements
ization established in the Decision on Principles for the
7.1 A chemical analysis shall be performed on each lot and
Development of International Standards, Guides and Recom-
shall conform to the following requirements for phosphorus
mendations issued by the World Trade Organization Technical
and sulfur:
Barriers to Trade (TBT) Committee.
Phosphorus, max, % 0.75
Sulfur, max, % 0.15
2. Referenced Documents
2 7.2 The chemical analysis shall be performed on a sample
2.1 ASTM Standards:
obtained during the pouring of the lot.
A48/A48M Specification for Gray Iron Castings
A644 Terminology Relating to Iron Castings
8. Tensile Properties
E8/E8M Test Methods for Tension Testing of Metallic Ma-
8.1 One tension test shall be performed on each lot and shall
terials
conform to the mechanical properties specified in Table 1.
3. Terminology
3.1 Definitions of many terms common to gray iron castings 9. Cast Test Bars
are found in Terminology A644.
9.1 Separately cast 1 ⁄8-in. (28.6-mm) diameter test bars
shown in Fig. 1 shall be poured in sand molds from the same
4. Classification
lot as the castings represented.
4.1 Castings produced to this specification are classified
based upon the minimum tensile strength of the iron (see Table NOTE 2—The numbering on the test specimens shown in Figs. 1 and 2
is intended simply to illustrate a method of designation. In the particular
1).
method shown refers to December 8, B1 is the cupola number, and the
numeral 1 which follows shows the hour cast (1 p.m.).
This specification is under the jurisdiction of ASTM Committee A04 on Iron
9.2 Test bars that are intended to represent castings which
Castings and is the direct responsibility of Subcommittee A04.01 on Grey and White
Iron Castings.
are cooled in the mold to less than 900 °F (480 °C) before
Current edition approved Nov. 1, 2019. Published November 2019. Originally
shakeout, shall be cooled in their molds to a temperature less
approved in 1929. Last previous edition approved in 2014 as A126 – 04 (2014).
than 900 °F, and then may be cooled in still air to room
DOI: 10.1520/A0126-04R19.
For referenced ASTM standards, visit the ASTM website, www.astm.org, or temperature.
contact ASTM Customer Service at service@astm.org. For Annual Book of ASTM
9.3 Test bars that are intended to represent castings which
Standards volume information, refer to the standard’s Document Summary page on
the ASTM website. are hotter than 900 °F when shaken out of their molds, shall be
Copyright © ASTM International, 100 Barr Harbor Drive, PO Box C700, West Conshohocken, PA 19428-2959. United States
A126 − 04 (2019)
Metric Equivalents
1 1 1 3 7 1 9 1 3 3
in. ⁄8 ⁄4 ⁄2 ⁄4 ⁄8 1 ⁄8 1.2 1 ⁄32 1 ⁄2 1 ⁄4 2 ⁄4 13
mm 3.2 6.4 12.7 19.0 22.2 28.6 30.5 32.5 38.1 44.4 69.8 1330
NOTE 1—These dimensions are suggested as satisfactory for average conditions, but may be varied to best suit individual pouring.
FIG. 1 Mold of Tension and Transverse Test Specimens
Metric Equivalents
in. mm in. mm
1 3
1 ⁄8 28.6 3 ⁄4 95.2
3 5
1 ⁄4 44.4 5 ⁄8 142.9
7 1
1 ⁄8 47.6 7 ⁄2 290.5
NOTE 1—Modification may be made to the grip-ends of the tension test specimen to allow alternative means of gripping as required by testing
procedures and equipment. Should alternative grip-ends be disputed, the threaded grip-ends shall be used.
FIG. 2 Tension Test Specimen
TABLE 1 Tensile Requirements
NOTE 3—Suitable socket specimens holders an
...
This document is not an ASTM standard and is intended only to provide the user of an ASTM standard an indication of what changes have been made to the previous version. Because
it may not be technically possible to adequately depict all changes accurately, ASTM recommends that users consult prior editions as appropriate. In all cases only the current version
of the standard as published by ASTM is to be considered the official document.
Designation: A126 − 04 (Reapproved 2014) A126 − 04 (Reapproved 2019)
Standard Specification for
Gray Iron Castings for Valves, Flanges, and Pipe Fittings
This standard is issued under the fixed designation A126; the number immediately following the designation indicates the year of
original adoption or, in the case of revision, the year of last revision. A number in parentheses indicates the year of last reapproval. A
superscript epsilon (´) indicates an editorial change since the last revision or reapproval.
This standard has been approved for use by agencies of the U.S. Department of Defense.
1. Scope
1.1 This specification covers three classes of gray iron for castings intended for use as valve pressure retaining pressure-
retaining parts, pipe fittings, and flanges.
1.2 The values stated in inch-pound units are to be regarded as standard. The values given in parentheses are mathematical
conversions to SI units that are provided for information only and are not considered standard.
NOTE 1—The text of this standard references notes and footnotes which provide explanatory material. These notes and footnotes (excluding those in
tables and figures) shall not be considered as requirements of the standard.
1.3 This international standard was developed in accordance with internationally recognized principles on standardization
established in the Decision on Principles for the Development of International Standards, Guides and Recommendations issued
by the World Trade Organization Technical Barriers to Trade (TBT) Committee.
2. Referenced Documents
2.1 ASTM Standards:
A48/A48M Specification for Gray Iron Castings
A644 Terminology Relating to Iron Castings
E8E8/E8M Test Methods for Tension Testing of Metallic Materials [Metric] E0008_E0008M
3. Terminology
3.1 Definitions of many terms common to gray iron castings are found in Terminology A644.
4. Classification
4.1 Castings produced to this specification are classified based upon the minimum tensile strength of the iron (see Table 1).
5. Ordering Information
5.1 Orders for material in this specification should include the following information:
5.1.1 ASTM designation and year date,
5.1.2 Class of iron required,
5.1.3 Quantity, and
5.1.4 Certification, if required (see Section 1617).).
6. Workmanship, Finish, and Appearance
6.1 The castings shall be made in a workmanlike manner and the surface shall be free of adhering sand, scale, cracks, and hot
tears as determined by visual examination.
This specification is under the jurisdiction of ASTM Committee A04 on Iron Castings and is the direct responsibility of Subcommittee A04.01 on Grey and White Iron
Castings.
Current edition approved April 1, 2014Nov. 1, 2019. Published April 2014November 2019. Originally approved in 1929. Last previous edition approved in 20092014 as
A126 – 04 (2009).(2014). DOI: 10.1520/A0126-04R14.10.1520/A0126-04R19.
For referenced ASTM standards, visit the ASTM website, www.astm.org, or contact ASTM Customer Service at service@astm.org. For Annual Book of ASTM Standards
volume information, refer to the standard’s Document Summary page on the ASTM website.
Copyright © ASTM International, 100 Barr Harbor Drive, PO Box C700, West Conshohocken, PA 19428-2959. United States
A126 − 04 (2019)
TABLE 1 Tensile Requirements
Class A Class B Class C
Tensile strength, min, ksi
21 (145) 31 (214) 41 (283)
(MPa)
7. Chemical Requirements
7.1 A chemical analysis shall be performed on each lot and shall conform to the following requirements for phosphorus and
sulfur:
Phosphorus, max, % 0.75
Sulfur, max, % 0.15
7.2 The chemical analysis shall be performed on a sample obtained during the pouring of the lot.
8. Tensile Properties
8.1 One tension test shall be performed on each lot and shall conform to the mechanical properties specified in
Table 1.
9. Cast Test Bars
9.1 Separately cast 1 ⁄8 in. (28.6 mm) -in. (28.6-mm) diameter test bars shown in Fig. 1 shall be poured in sand molds from the
same lot as the castings represented.
NOTE 2—The numbering on the test specimens shown in Fig. 1Figs. 1 and 2 and Fig. 2is intended simply to illustrate a method of designation. In the
particular method shown refers to December 8, B1 is the cupola number, and the numeral 1 which follows shows the hour cast (1 p.m.).
9.2 Test bars that are intended to represent castings which are cooled in the mold to less than 900°F (480°C)900 °F (480 °C)
before shakeout, shall be cooled in their molds to a temperature less than 900°F,900 °F, and then may be cooled in still air to room
temperature.
9.3 Test bars that are intended to represent castings which are hotter than 900°F900 °F when shaken out of their molds, shall
be cooled as described in 9.29.2 or (by agreement between the manufacturer and the purchaser) may be shaken out of their molds
at approximately the same temperature as the castings they represent.
10. Tension Test Apparatus
10.1 Ball and socket Ball-and-socket specimen holders or spherical-seated bearings or other device which will ensure that the
specimen, when under load, will be as nearly as possible in pure axial tension without transverse stress shall be used in making
the tension test.
NOTE 3—Suitable so
...


Questions, Comments and Discussion
Ask us and Technical Secretary will try to provide an answer. You can facilitate discussion about the standard in here.