ASTM F106-24
(Specification)Standard Specification for Brazing Filler Metals for Electron Devices
Standard Specification for Brazing Filler Metals for Electron Devices
ABSTRACT
This specification covers brazing filler metals for use in electron devices in a nonoxidizing atmosphere. Material covered by this specification consists of vacuum grade (Grades 1 and 2) brazing filler metals manufactured in the form of strip, wire, or preforms made by blanking the trip or bending the wire. Brazing filler metals in the form of powder are also available. Filler metals in wire form shall be in soft temper condition, most suitable for hand feeding or ring winding in mandrels, while those in strip form shall be in hard as-rolled temper condition to facilitate clean blanking of thin shims or preforms. The surface of the filler metal, whether strip, wire, or preform, shall be as smooth and free of dirt, oxide, pits, deep scratches, seams, slivers, stains, scale, blisters, edge cracks, trimming burrs, waves, wrinkles, and other defects as commercially possible. Melting test for cleanness and spatter shall be performed and shall conform to the requirements specified.
SCOPE
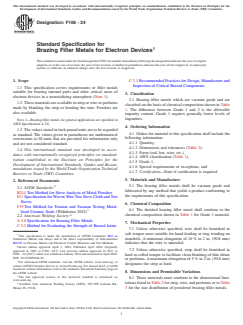
1.1 This specification covers requirements or filler metals suitable for brazing internal parts and other critical areas of electron devices in a nonoxidizing atmosphere (Note 1).
1.2 These materials are available in strip or wire or preforms made by blanking the strip or bending the wire. Powders are also available.
Note 1: Brazing filler metals for general applications are specified in AWS Specification A 5.8.
1.3 The values stated in inch-pound units are to be regarded as standard. The values given in parentheses are mathematical conversions to SI units that are provided for information only and are not considered standard.
1.4 This international standard was developed in accordance with internationally recognized principles on standardization established in the Decision on Principles for the Development of International Standards, Guides and Recommendations issued by the World Trade Organization Technical Barriers to Trade (TBT) Committee.
General Information
- Status
- Published
- Publication Date
- 31-Mar-2024
- Technical Committee
- B02 - Nonferrous Metals and Alloys
Relations
- Effective Date
- 01-Apr-2024
Overview
ASTM F106-24: Standard Specification for Brazing Filler Metals for Electron Devices provides comprehensive requirements for vacuum-grade brazing filler metals intended for use in electron devices, specifically those that require brazing in nonoxidizing atmospheres. The standard, developed and maintained by ASTM International, ensures the critical performance characteristics required for internal components and highly sensitive areas in electron devices. Filler metals covered by this standard are available in various forms, including strip, wire, preforms, and powder, and are classified into Grades 1 and 2 based on impurity limits.
Common applications for these brazing materials include joining internal parts of vacuum tubes, semiconductors, and other electronic assemblies where atmospheric contamination and impurity levels can significantly affect device performance and reliability.
Key Topics
- Vacuum Grade Brazing Filler Metals: Specifies both chemical composition and physical properties for metals used in electron device assemblies, ensuring high purity and minimal volatile contaminants.
- Material Forms & Conditioning: Metals are provided in strip, wire, preforms (from strip or wire), and powder. Wire is supplied in soft temper, ideal for hand feeding or ring winding, while strips are in hard as-rolled temper, supporting clean blanking of thin preforms.
- Surface and Finish Requirements: Surfaces must be smooth, clean, and as free as possible from oxides, pits, scratches, and other manufacturing or handling defects according to best commercial practices.
- Grades and Classifications:
- Grade 1: Most stringent impurity requirements for critical electronic applications.
- Grade 2: Permits slightly higher impurity levels, suitable for less critical uses.
- Testing and Compliance: Includes procedures for melting tests to assess cleanness and spatter, as well as tensile and vacuum requirements to ensure the reliability of electron device assemblies.
- Dimensional Control: Detailed tolerances for thickness, width, diameter, and camber guarantee consistent quality across all material forms.
- Certification & Packaging: Options for certification supplied at customer request and clear marking and packaging specifications to maintain metal cleanliness and traceability.
Applications
ASTM F106-24 brazing filler metals are vital for:
- Internal Assembly of Electron Devices: Use in vacuum tubes, semiconductor devices, and microwave systems where high-purity, non-volatile fillers are required to prevent contamination and device failure.
- Specialized Brazing in Nonoxidizing Atmospheres: Ensures minimal oxidation or contamination during joining, critical for maintaining electron device performance.
- Step Brazing Operations: Offers alloys capable of sequential operations without remelting previously joined areas, crucial in assembly processes involving multiple joints.
- Metal/Ceramic Joints: Particularly applicable for joining metallized ceramics to controlled-expansion alloys, as seen in high-reliability electronic packaging.
Related Standards
Professionals working with ASTM F106-24 may also reference the following standards for comprehensive enterprise compliance and optimal manufacturing outcomes:
- AWS A5.8 - Specification for Brazing Filler Metals: Covers general-purpose brazing materials used across a broader spectrum of applications outside of high-purity electron devices.
- ASTM B214 - Test Method for Sieve Analysis of Metal Powders: Useful when brazing filler metals are supplied in powder form.
- ASTM E11 - Specification for Woven Wire Test Sieve Cloth and Test Sieves: Supporting accurate quality and particle size distribution in powder forms.
- AWS C3.2 - Method for Evaluating the Strength of Brazed Joints: Provides additional methods for verifying joint strength in critical assemblies.
- ASTM C3.3 - Recommended Practices for Design, Manufacture, and Inspection of Critical Brazed Components: Reference for best practices in brazed assembly of sensitive components.
Keywords: ASTM F106-24, vacuum grade brazing filler metals, electron devices, nonoxidizing atmosphere, internal brazing, impurity limits, step brazing, electronic assembly standards, brazing wire, brazing strip, electronic component reliability.
Buy Documents
ASTM F106-24 - Standard Specification for Brazing Filler Metals for Electron Devices
Frequently Asked Questions
ASTM F106-24 is a technical specification published by ASTM International. Its full title is "Standard Specification for Brazing Filler Metals for Electron Devices". This standard covers: ABSTRACT This specification covers brazing filler metals for use in electron devices in a nonoxidizing atmosphere. Material covered by this specification consists of vacuum grade (Grades 1 and 2) brazing filler metals manufactured in the form of strip, wire, or preforms made by blanking the trip or bending the wire. Brazing filler metals in the form of powder are also available. Filler metals in wire form shall be in soft temper condition, most suitable for hand feeding or ring winding in mandrels, while those in strip form shall be in hard as-rolled temper condition to facilitate clean blanking of thin shims or preforms. The surface of the filler metal, whether strip, wire, or preform, shall be as smooth and free of dirt, oxide, pits, deep scratches, seams, slivers, stains, scale, blisters, edge cracks, trimming burrs, waves, wrinkles, and other defects as commercially possible. Melting test for cleanness and spatter shall be performed and shall conform to the requirements specified. SCOPE 1.1 This specification covers requirements or filler metals suitable for brazing internal parts and other critical areas of electron devices in a nonoxidizing atmosphere (Note 1). 1.2 These materials are available in strip or wire or preforms made by blanking the strip or bending the wire. Powders are also available. Note 1: Brazing filler metals for general applications are specified in AWS Specification A 5.8. 1.3 The values stated in inch-pound units are to be regarded as standard. The values given in parentheses are mathematical conversions to SI units that are provided for information only and are not considered standard. 1.4 This international standard was developed in accordance with internationally recognized principles on standardization established in the Decision on Principles for the Development of International Standards, Guides and Recommendations issued by the World Trade Organization Technical Barriers to Trade (TBT) Committee.
ABSTRACT This specification covers brazing filler metals for use in electron devices in a nonoxidizing atmosphere. Material covered by this specification consists of vacuum grade (Grades 1 and 2) brazing filler metals manufactured in the form of strip, wire, or preforms made by blanking the trip or bending the wire. Brazing filler metals in the form of powder are also available. Filler metals in wire form shall be in soft temper condition, most suitable for hand feeding or ring winding in mandrels, while those in strip form shall be in hard as-rolled temper condition to facilitate clean blanking of thin shims or preforms. The surface of the filler metal, whether strip, wire, or preform, shall be as smooth and free of dirt, oxide, pits, deep scratches, seams, slivers, stains, scale, blisters, edge cracks, trimming burrs, waves, wrinkles, and other defects as commercially possible. Melting test for cleanness and spatter shall be performed and shall conform to the requirements specified. SCOPE 1.1 This specification covers requirements or filler metals suitable for brazing internal parts and other critical areas of electron devices in a nonoxidizing atmosphere (Note 1). 1.2 These materials are available in strip or wire or preforms made by blanking the strip or bending the wire. Powders are also available. Note 1: Brazing filler metals for general applications are specified in AWS Specification A 5.8. 1.3 The values stated in inch-pound units are to be regarded as standard. The values given in parentheses are mathematical conversions to SI units that are provided for information only and are not considered standard. 1.4 This international standard was developed in accordance with internationally recognized principles on standardization established in the Decision on Principles for the Development of International Standards, Guides and Recommendations issued by the World Trade Organization Technical Barriers to Trade (TBT) Committee.
ASTM F106-24 has the following relationships with other standards: It is inter standard links to ASTM F106-12(2017). Understanding these relationships helps ensure you are using the most current and applicable version of the standard.
ASTM F106-24 is available in PDF format for immediate download after purchase. The document can be added to your cart and obtained through the secure checkout process. Digital delivery ensures instant access to the complete standard document.
Standards Content (Sample)
This international standard was developed in accordance with internationally recognized principles on standardization established in the Decision on Principles for the
Development of International Standards, Guides and Recommendations issued by the World Trade Organization Technical Barriers to Trade (TBT) Committee.
Designation: F106 − 24
Standard Specification for
Brazing Filler Metals for Electron Devices
This standard is issued under the fixed designation F106; the number immediately following the designation indicates the year of original
adoption or, in the case of revision, the year of last revision. A number in parentheses indicates the year of last reapproval. A superscript
epsilon (´) indicates an editorial change since the last revision or reapproval.
1. Scope C 3.3 Recommended Practices for Design, Manufacture and
Inspection of Critical Brazed Components
1.1 This specification covers requirements or filler metals
suitable for brazing internal parts and other critical areas of
3. Classification
electron devices in a nonoxidizing atmosphere (Note 1).
3.1 Brazing filler metals which are vacuum grade and are
1.2 These materials are available in strip or wire or preforms
classified on the basis of chemical composition shown in Table
made by blanking the strip or bending the wire. Powders are
1. The difference between Grade 1 and 2 is the allowable
also available.
impurity content. Grade 1 requires generally lower levels of
impurities.
NOTE 1—Brazing filler metals for general applications are specified in
AWS Specification A 5.8.
4. Ordering Information
1.3 The values stated in inch-pound units are to be regarded
4.1 Orders for material to this specification shall include the
as standard. The values given in parentheses are mathematical
following information:
conversions to SI units that are provided for information only
4.1.1 Quantity,
and are not considered standard.
4.1.2 Dimensions and tolerances (Table 2),
1.4 This international standard was developed in accor-
4.1.3 Form (rod, bar, wire, etc.),
dance with internationally recognized principles on standard-
4.1.4 AWS classification (Table 1),
ization established in the Decision on Principles for the
4.1.5 Grade 1,
Development of International Standards, Guides and Recom-
4.1.6 Special requirements or exceptions, and
mendations issued by the World Trade Organization Technical
4.1.7 Certification—State if certification is required.
Barriers to Trade (TBT) Committee.
5. Materials and Manufacture
2. Referenced Documents
5.1 The brazing filler metals shall be vacuum grade and
2.1 ASTM Standards:
fabricated by any method that yields a product conforming to
B214 Test Method for Sieve Analysis of Metal Powders
the requirements of this specification.
E11 Specification for Woven Wire Test Sieve Cloth and Test
Sieves
6. Chemical Composition
F19 Test Method for Tension and Vacuum Testing Metal-
3 6.1 The finished brazing filler metal shall conform to the
lized Ceramic Seals (Withdrawn 2023)
4 chemical composition shown in Table 1 for Grade 1 material.
2.2 American Welding Society:
A 5.8 Specification for Brazing Filler Metals
7. Mechanical Properties
C 3.2 Method for Evaluating the Strength of Brazed Joints
7.1 Unless otherwise specified, wire shall be furnished in
soft temper most suitable for hand feeding or ring winding on
This specification is under the jurisdiction of ASTM Committee B02 on
mandrels. A minimum elongation of 10 % in 2 in. (50.8 mm)
Nonferrous Metals and Alloys and is the direct responsibility of Subcommittee
B02.05 on Precious Metals and Electrical Contact Materials and Test Methods. indicates that the wire is annealed.
Current edition approved April 1, 2024. Published April 2024. Originally
7.2 Unless otherwise specified, strip shall be furnished in
approved in 1969 as F106 – 69 T. Last previous edition approved in 2017 as
F106 – 12 (2017) which was withdrawn January 2024 and reinstated in April 2024.
hard as-rolled temper to facilitate clean blanking of thin shims
DOI: 10.1520/F0106-24.
or preforms. A maximum elongation of 5 % in 2 in. (50.8 mm)
For referenced ASTM standards, visit the ASTM website, www.astm.org, or
designates the strip as hard.
contact ASTM Customer Service at service@astm.org. For Annual Book of ASTM
Standards volume information, refer to the standard’s Document Summary page on
8. Dimensions and Permissible Variations
the ASTM website.
The last approved version of this historical standard is referenced on
8.1 These materials must conform to the dimensional limi-
www.astm.org.
4 tations listed in Table 2 for strip, wire, and preforms or to Table
Available from American Welding Society (AWS), 550 NW LeJeune Rd.,
Miami, FL 33126. 3 for the size distribution of powdered brazing filler metals.
Copyright © ASTM International, 100 Barr Harbor Drive, PO Box C700, West Conshohocken, PA 19428-2959. United States
F106 − 24
A,B,C
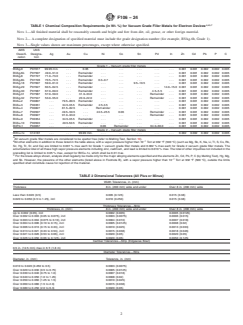
TABLE 1 Chemical Composition Requirements (in Wt. %) for Vacuum Grade Filler Metals for Electron Devices
NOTE 1—All finished material shall be reasonably smooth and bright and free from dirt, oil, grease, or other foreign material.
NOTE 2— A complete designation of specified material must include the grade designation number (for example, BVAg-6b, Grade 1).
NOTE 3—Single values shown are maximum percentages, except where otherwise specified.
AWS UNS
Classifi- Designa- Ag Au Cu Ni Co Sn Pd In Zn Cd Pb P C
cation tion
Grade 1 – Vacuum grade filler metals
BVAg-0 P07017 99.95 min. . . . 0.05 . . . . . . . . . . . . . . . 0.001 0.001 0.002 0.002 0.005
BVAg-6b P07507 49.0–51.0 . . . Remainder . . . . . . . . . . . . . . . 0.001 0.001 0.002 0.002 0.005
BVAg-8 P07727 71.0–73.0 . . . Remainder . . . . . . . . . . . . . . . 0.001 0.001 0.002 0.002 0.005
BVAg-8b P07728 70.5–72.5 . . . Remainder 0.3–0.7 . . . . . . . . . . . . 0.001 0.001 0.002 0.002 0.005
BVAg-18 P07607 59.0–61.0 . . . Remainder . . . . . . 9.5–10.5 . . . . . . 0.001 0.001 0.002 0.002 0.005
BVAg-29 P07627 60.5–62.5 . . . Remainder . . . . . . . . . . . . 14.0–15.0 0.001 0.001 0.002 0.002 0.005
BVAg-30 P07687 67.0–69.0 . . . Remainder . . . . . . . . . 4.5–5.5 . . . 0.001 0.001 0.002 0.002 0.005
BVAg-31 P07587 57.0–59.0 . . . 31.0–33.0 . . . . . . . . . Remainder . . . 0.001 0.001 0.002 0.002 0.005
BVAg-32 P07547 53.0–55.0 . . . 20.0–22.0 . . . . . . . . . Remainder . . . 0.001 0.001 0.002 0.002 0.005
BVAu-2 P00807 . . . 79.5–80.5 Remainder . . . . . . . . . . . . . . . 0.001 0.001 0.002 0.002 0.005
BVAu-3 P00351 . . . 34.5-35.5 Remainder 2.5-3.5 . . . . . . . . . . . . 0.001 0.001 0.002 0.002 0.005
BVAu-4 P00827 . . . 81.5–82.5 . . . Remainder . . . . . . . . . . . . 0.001 0.001 0.002 0.002 0.005
BVAu-7 P00507 . . . 49.5–50.5 . . . 24.5–25.5 0.06 . . . Remainder . . . 0.001 0.001 0.002 0.002 0.005
BVAu-8 P00927 . . . 91.0–93.0 . . . . . . . . . . . . Remainder . . . 0.001 0.001 0.002 0.002 0.005
BVAu-9 P00354 . . . 34.5-35.5 Remainder . . . . . . . . . . . . . . . 0.001 0.001 0.002 0.002 0.005
BVAu-10 P00503 . . . 49.5-50.5 Remainder . . . . . . . . . . . . . . . 0.001 0.001 0.002 0.002 0.005
BVPd-1 P03657 . . . . . . . . . 0.06 Remainder . . . 64.0–66.0 . . . 0.001 0.001 0.002 0.002 0.005
Grade 2 – Vacuum grade filler metals
BVCu-1x C14181 . . . . . . 99.99 min. . . . . . . . . . . . . . . . 0.002 0.002 0.002 0.002 0.005
A
All vacuum grade filler metals are considered to be spatter free (refer to Melting Test, Section 10).
B −7
All other elements in addition to those listed in the table above, with a vapor pressure higher than 10 Torr at 932 °F (500 °C) (such as Mg, Sb, K, Na, Li, Tl, S, Cs, Rb,
Sc, Hg, Tc, Sr, and Ca) are limited to 0.001 % max each for Grade 1 vacuum grade filler metals and 0.002 % max each for Grade 2 vacuum grade filler metals. The
accumulative total of all these high vapor pressure elements including zinc, cadmium, and lead is limited to 0.010 % max. The total of other impurities not included in the
preceding list is limited to 0.05 % max, except for BVCu-1x, which shall be 0.01 max.
C
For the braze alloys shown, analysis shall regularly be made only for the major alloying elements specified and the elements Zn, Cd, Pb, P, C (by Melting Test), Hg, Mg,
−7
and Sb. However, the presence of the other elements (listed above in Footnote B), with a vapor pressure higher than 10 Torr at 932 °F (500 °C), outside the limits
specified shall constitute cause for rejection of the material.
TABLE 2 Dimensional Tolerances (All Plus or Minus)
Width Tolerances, in. (mm)
Thickness 8 in. (200 mm) wide and under Over 8 in. (200 mm) wide
Less than 0.020 (0.5) 0.005 (0.125) 0.015 (0.38)
0.020 to 0.050 (0.5 to 1.25), incl 0.010 (0.250) 0.015 (0.38)
Thickness Tolerances—Strip
Thickness, in. (mm) 8 in. (200 mm) wide and under Over 8 in. (200 mm) wide
Up to 0.002 (0.05), incl 0.0002 (0.005) 0.0005 (0.0125)
Over 0.002 to 0.003 (0.05 to 0.075), incl 0.0003 (0.0075) 0.0006 (0.015)
Over 0.003 to 0.004 (0.075 to 0.10), incl 0.0004 (0.010) 0.0007 (0.018)
Over 0.004 to 0.006 (0.10 to 0.15), incl 0.0005 (0.0125) 0.0008 (0.02)
Over 0.006 to 0.013 (0.15 to 0.33), incl 0.0010 (0.025) 0.0013 (0.033)
Over 0.013 to 0.021 (0.33 to 0.53), incl 0.0015 (0.038) 0.0018 (0.046)
Over 0.021 to 0.026 (0.53 to 0.66), incl 0.0020 (0.05) 0.0020 (0.05)
Over 0.026 to 0.050 (0.66 to 0.125), incl 0.0020 (0.05) 0.0050 (0.125)
Camber Tolerances—Strip (Edgewise Bowl)
0.5 in. (12.5 mm) max in 6 ft (1.8 m)
Diameter Tolerances—Wire
Diameter, in. (mm) Tolerance, in. (mm)
0.010 to 0.020 (0.250 to 0.5) 0.0003 (0.0075)
Over 0.020 to 0.030 (0.5 to 0.75) 0.0005 (0.0125)
Over 0.030 to 0.040 (0.75 to 1.0) 0.0007 (0.018)
Over 0.040 to 0.050 (1.0 to 1.25) 0.0008 (0.02)
Over 0.050 to 0.060 (1.25 to 1.5) 0.0010 (0.025)
Over 0.060 to 0.080 (1.5 to 2.0) 0.0015 (0.038)
Over 0.080 to 0.250 (2.0 to 6.3) 0.0020 (0.05)
F106 − 24
A
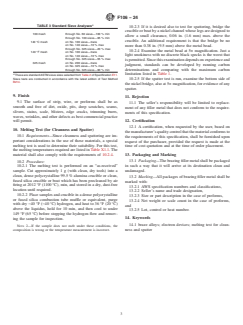
TABLE 3 Standard Sieve Analyses
10.2.3 If it is desired also to test for spattering, bridge the
crucible or boat by a nickel channel whose legs are designed to
100 mesh through No. 60 sieve—100 % min
allow a small clearance, 0.06 in. (1.6 mm) max. above the
through No. 100 sieve—95 % min
crucible. An additional requirement is that the bridge be no
140 °C mesh on No. 100 sieve—trace
on No. 140 sieve—10 % max
more than 0.38 in. (9.5 mm) above the metal bead.
through No. 325 sieve—20 % max
10.2.4 Examine the metal bead at 5× magnification. Just a
140 °F mesh on No. 100 sieve—trace
light smokiness with no discrete black specks is the worst that
on No. 140 sieve—10 % max
through No. 325 sieve—55 % max
is permitted. Since this examination depends on experience and
325 mesh on No. 200 sieve—trace
judgment, standards can be developed by running carbon
on No. 325 sieve—10 % max
through No. 325 sieve—90 % min determinations and comparing with the maximum carbon
A
limitation listed in Table 1.
These are standard ASTM sieve sizes selected from Table 2 of Specification E11.
Sieve tests are conducted in accordance with the latest edition of Test Method
10.2.5 If the spatter test is run, examine the bottom side of
B214.
the nickel bridge, also at 5× magnification, for evidence of any
spatter.
9. Finish
11. Rejection
9.1 The surface of strip, wire, or preforms shall be as
11.1 The seller’s responsibility will be limited to replace-
smooth and free of dirt, oxide, pits, deep scratches, seams,
ment of any filler metal that does not conform to the require-
slivers, stains, scale, blisters, edge cracks, trimming burrs,
ments of this specification.
waves, wrinkles, and other defects as best commercial practice
12. Certification
will permit.
12.1 A certification, when requested by the user, based on
10. Melting Test (for Cleanness and Spatter)
the manufacturer’s quality control that the material conforms to
10.1 Requirements—Since cleanness and spattering are im-
the requirements of this specification, shall be furnished upon
portant considerations in the use of these materials, a special
request of the purchaser, provided the request is made at the
melting test is used to determine their suitability. For this test,
time of cost quotation and at the time of order placement.
the melting temperatures required are listed in
Table X1.1. The
13. Packaging and Marking
material shall also comply with the requirements of 10.2.4.
13.1 Packaging—The brazing filler metal shall be packaged
10.2 Procedure:
in such a way that it will arrive at its destination clean and
10.2.1 The melting test is performed on an “as-received”
undamaged.
sample. Cut approximately 1 g (with clean, dry tools) into a
clean, dense polycrystalline 99.5 % alumina crucible or clean,
13.2 Marking—All packages of brazing filler metal shall be
fused silica crucible or boat which has been precleaned by air
marked with:
fir
...


Questions, Comments and Discussion
Ask us and Technical Secretary will try to provide an answer. You can facilitate discussion about the standard in here.
Loading comments...