ASTM E2905/E2905M-13
(Practice)Standard Practice for Examination of Mill and Kiln Girth Gear Teeth—Electromagnetic Methods
Standard Practice for Examination of Mill and Kiln Girth Gear Teeth—Electromagnetic Methods
SIGNIFICANCE AND USE
5.1 Visual interpretation of gear teeth condition is different from examining for cracks or early signs of macro-pitting. Visual interpretation is referred to ANSI/AGMA 1010 E-95.
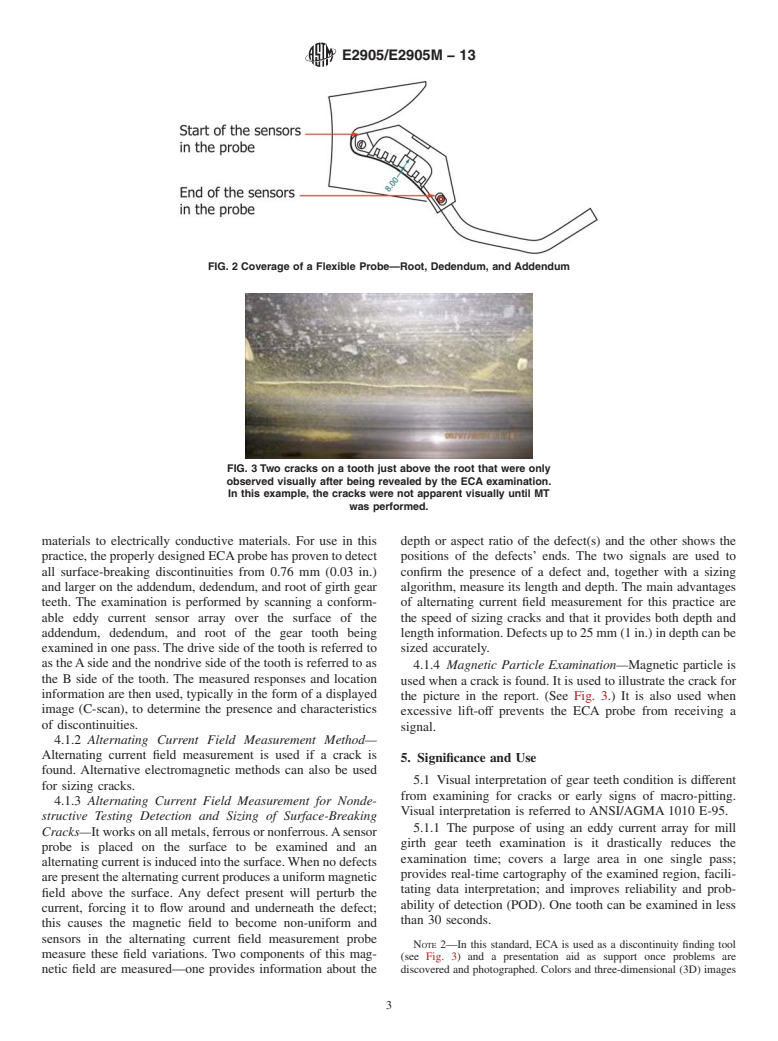
5.1.1 The purpose of using an eddy current array for mill girth gear teeth examination is it drastically reduces the examination time; covers a large area in one single pass; provides real-time cartography of the examined region, facilitating data interpretation; and improves reliability and probability of detection (POD). One tooth can be examined in less than 30 seconds.Note 2—In this standard, ECA is used as a discontinuity finding tool (see Fig. 3) and a presentation aid as support once problems are discovered and photographed. Colors and three-dimensional (3D) images (see Fig. 4) that help with visualization are invaluable in such circumstances.
5.1.2 The purpose of using alternating current field measurement is to size surface-breaking cracks electronically.
5.1.3 This practice is a useful tool for a condition-based monitoring program.
5.2 The examination results may then be used by qualified personnel or organizations to assess remaining service life or other engineering characteristics (beyond the scope of this practice). This practice is not intended for the examination of non-surface-breaking discontinuities.
SCOPE
1.1 This practice describes a two-part procedure for electromagnetic evaluation on gear teeth on mill and kiln gear drives and pinions. The first part of this practice details the ability to detect 100 % of surface-breaking discontinuities only in the addendum, dedendum, and root area on both the drive side and non-drive side of the gear tooth using an eddy current array. The second part of the examination is to size or measure accurately the length and depth of any cracks found in these areas using electromagnetic methods. No other practice addresses the use of electromagnetic methods for the detection and sizing of surface-breaking discontinuities on mill and kiln ring gear teeth.
1.2 This practice is used only for crack detection, alignment issues, wear patterns, and early signs of macro-pitting. It will not illustrate a full gear tooth analysis. Visual examination by an experienced gear technician is the only way to analyze fully gear teeth wear patterns and potential failure.
1.3 Two technicians, or one technician and a technical assistant, are typically required for this practice. One technical assistant guides the probe and the technician operates the computer/software and analyzes the gear teeth condition.
1.4 It is important that the appropriate method standards, such as Guide E709 and Practice E2261, if the alternating current field measurement approach is used for crack sizing, accompany the technician when performing the examination.
1.5 It is recommended that the technician reviews the appendixes in this practice in advance of starting the job.
1.6 A clean gear is recommended for a complete gear analysis. Depending on the lubrication used, the technician, in discussion with the client, shall determine the appropriate cleaning procedure, if cleaning is required. If an oil bath lubrication system is used, ensure the gear teeth surface is clean. If an asphaltic-based or synthetic-based lubricant is used, refer to the annexes and appendices in this practice.
1.7 Units—The values stated in either SI units or inch-pound units are to be regarded separately as standard. The values stated in each system may not be exact equivalents; therefore, each system shall be used independently of the other. Combining values from the two systems may result in nonconformance with the standard.
1.8 This standard does not purport to address all of the safety concerns, if any, associated with its use. It is the responsibility of the user of this standard to establish appropriate safety and health practices and determine the applicability of regulatory limitations prior to use.
General Information
Relations
Buy Standard
Standards Content (Sample)
NOTICE: This standard has either been superseded and replaced by a new version or withdrawn.
Contact ASTM International (www.astm.org) for the latest information
Designation: E2905/E2905M − 13
Standard Practice for
Examination of Mill and Kiln Girth Gear Teeth—
1
Electromagnetic Methods
ThisstandardisissuedunderthefixeddesignationE2905/E2905M;thenumberimmediatelyfollowingthedesignationindicatestheyear
of original adoption or, in the case of revision, the year of last revision. A number in parentheses indicates the year of last reapproval.
A superscript epsilon (´) indicates an editorial change since the last revision or reapproval.
1. Scope* clean. If an asphaltic-based or synthetic-based lubricant is
used, refer to the annexes and appendices in this practice.
1.1 This practice describes a two-part procedure for electro-
magnetic evaluation on gear teeth on mill and kiln gear drives 1.7 Units—The values stated in either SI units or inch-
and pinions. The first part of this practice details the ability to
pound units are to be regarded separately as standard. The
detect 100 % of surface-breaking discontinuities only in the values stated in each system may not be exact equivalents;
addendum, dedendum, and root area on both the drive side and
therefore,eachsystemshallbeusedindependentlyoftheother.
non-drive side of the gear tooth using an eddy current array. Combining values from the two systems may result in noncon-
The second part of the examination is to size or measure
formance with the standard.
accurately the length and depth of any cracks found in these
1.8 This standard does not purport to address all of the
areas using electromagnetic methods. No other practice ad-
safety concerns, if any, associated with its use. It is the
dresses the use of electromagnetic methods for the detection
responsibility of the user of this standard to establish appro-
and sizing of surface-breaking discontinuities on mill and kiln
priate safety and health practices and determine the applica-
ring gear teeth.
bility of regulatory limitations prior to use.
1.2 This practice is used only for crack detection, alignment
issues, wear patterns, and early signs of macro-pitting. It will 2. Referenced Documents
not illustrate a full gear tooth analysis. Visual examination by
2
2.1 ASTM Standards:
an experienced gear technician is the only way to analyze fully
E709 Guide for Magnetic Particle Testing
gear teeth wear patterns and potential failure.
E1316 Terminology for Nondestructive Examinations
1.3 Two technicians, or one technician and a technical E2261 Practice for Examination of Welds Using the Alter-
assistant, are typically required for this practice. One technical
nating Current Field Measurement Technique
assistant guides the probe and the technician operates the
E2884 Guide for Eddy Current Testing of Electrically Con-
computer/software and analyzes the gear teeth condition.
ducting Materials Using Conformable Sensor Arrays
3
1.4 It is important that the appropriate method standards, 2.2 AIA Standard:
such as Guide E709 and Practice E2261, if the alternating NAS 410 Certification and Qualification of Nondestructive
current field measurement approach is used for crack sizing, Test Personnel
4
accompany the technician when performing the examination.
2.3 ANSI/AGMA Standards:
AGMA 912-A04 Mechanisms of Gear Tooth Failures—
1.5 It is recommended that the technician reviews the
Information Sheet
appendixes in this practice in advance of starting the job.
ANSI/AGMA 1010 E-95 Standard for Appearance of Gear
1.6 A clean gear is recommended for a complete gear
Teeth—Terminology of Wear and Failure
analysis. Depending on the lubrication used, the technician, in
ANSI/AGMA 1012 G-05 Gear Nomenclature, Definition of
discussion with the client, shall determine the appropriate
Terms
cleaning procedure, if cleaning is required. If an oil bath
lubrication system is used, ensure the gear teeth surface is
2
For referenced ASTM standards, visit the ASTM website, www.astm.org, or
contact ASTM Customer Service at service@astm.org. For Annual Book of ASTM
1
This test method is under the jurisdiction of ASTM Committee E07 on Standards volume information, refer to the standard’s Document Summary page on
Nondestructive Testing and is the direct responsibility of Subcommittee E07.07 on the ASTM website.
3
Electromagnetic Method. Available fromAerospace IndustriesAssociation ofAmerica, Inc. (AIA), 1000
Current edition approved Dec. 1, 2013. Published December 2013. Originally WilsonBlvd.,Suite1700,Arlington,VA22209-3928,http://www.aia-aerospace.org.
4
appeared in 2012. Last previous edition appeared in 2012 as E2905/E2905M– 12. Available fromAmerican National Standards Institute (ANSI), 25 W. 43rd St.,
DOI: 10.1520/E2905_E2905M-13. 4th Floor, New York, NY 10036, http://www.ansi.org.
*A Summary of Changes section appears at the end of this standard
Copyright © ASTM International, 100 Barr Harbor Drive, PO Box C700, West Conshohocken, PA 19428-2959. United
...
This document is not an ASTM standard and is intended only to provide the user of an ASTM standard an indication of what changes have been made to the previous version. Because
it may not be technically possible to adequately depict all changes accurately, ASTM recommends that users consult prior editions as appropriate. In all cases only the current version
of the standard as published by ASTM is to be considered the official document.
Designation: E2905/E2905M − 12 E2905/E2905M − 13
Standard Practice for
Examination of Mill and Kiln Girth Gear Teeth—
1
Electromagnetic Methods
This standard is issued under the fixed designation E2905/E2905M; the number immediately following the designation indicates the year
of original adoption or, in the case of revision, the year of last revision. A number in parentheses indicates the year of last reapproval.
A superscript epsilon (´) indicates an editorial change since the last revision or reapproval.
1. Scope Scope*
1.1 This practice describes a two-part procedure for electromagnetic evaluation on gear teeth on mill and kiln gear drives and
pinions. The first part of this practice details the ability to detect 100 % of surface-breaking discontinuities only in the addendum,
dedendum, and root area on both the drive side and non-drive side of the gear tooth. tooth using an eddy current array. The second
part of the examination is to have the ability to size or measure accurately the length and depth of any cracks found in these areas.
No existingareas using electromagnetic methods. No other practice addresses the use of eddy current array electromagnetic
methods for the detection and sizing of surface-breaking discontinuities on mill and kiln gear teeth combined with alternating
current field measurement to size accurately any cracks found, length and depth.ring gear teeth.
1.2 This practice is used only for crack detection detection, alignment issues, wear patterns, and early signs of macro-pitting.
It will not illustrate a full gear tooth analysis. Visual examination by an experienced gear technician is the only way to analyze
fully gear teeth wear patterns and potential failure.
1.3 Two technicians are technicians, or one technician and a technical assistant, are typically required for this practice. One
technical assistant guides the probe and the other technician operates the computer/software and analyzes the gear teeth condition.
1.4 It is important that the appropriate method standards, such as Guide E709 and Practice E2261 and Guides, if the
E709alternating current field measurement approach is used for crack sizing, accompany the technician when performing the
examination.
1.5 It is recommended that the technician reviews the appendixes in this practice well in advance of starting the job.
1.6 A clean gear is recommended for a complete gear analysis. Depending on the lubrication used, the technician, in discussion
with the client, shall determine what cleaning procedure should be used. If a non-asphaltic lubricant the appropriate cleaning
procedure, if cleaning is required. If an oil bath lubrication system is used, ensure the gear teeth surface is clean. If an
asphaltic-based or synthetic-based lubricant is used, refer to the annexes and appendixesappendices in this practice.
1.7 Units—The values stated in either SI units or inch-pound units are to be regarded separately as standard. The values stated
in each system may not be exact equivalents; therefore, each system shall be used independently of the other. Combining values
from the two systems may result in nonconformance with the standard.
1.8 This standard does not purport to address all of the safety concerns, if any, associated with its use. It is the responsibility
of the user of this standard to establish appropriate safety and health practices and determine the applicability of regulatory
limitations prior to use.
2. Referenced Documents
2
2.1 ASTM Standards:
E709 Guide for Magnetic Particle Testing
E1316 Terminology for Nondestructive Examinations
E2261 Practice for Examination of Welds Using the Alternating Current Field Measurement Technique
E2884 Guide for Eddy Current Testing of Electrically Conducting Materials Using Conformable Sensor Arrays
1
This test method is under the jurisdiction of ASTM Committee E07 on Nondestructive Testing and is the direct responsibility of Subcommittee E07.07 on Electromagnetic
Method.
Current edition approved Nov. 15, 2012Dec. 1, 2013. Published November 2012December 2013. Originally appeared in 2012. Last previous edition appeared in 2012 as
E2905/E2905M– 12. DOI: 10.1520/E2905_E2905M-12.10.1520/E2905_E2905M-13.
2
For referenced ASTM standards, visit the ASTM website, www.astm.org, or contact ASTM Customer Service at service@astm.org. For Annual Book of ASTM Standards
volume information, refer to the standard’s Document Summary page on the ASTM website.
*A Summary of Changes section appears at the end of this standard
Copyright © ASTM International, 100 Barr Harbor
...


Questions, Comments and Discussion
Ask us and Technical Secretary will try to provide an answer. You can facilitate discussion about the standard in here.