ASTM D3914-02(2016)
(Test Method)Standard Test Method for In-Plane Shear Strength of Pultruded Glass-Reinforced Plastic Rod
Standard Test Method for In-Plane Shear Strength of Pultruded Glass-Reinforced Plastic Rod
SIGNIFICANCE AND USE
5.1 Shear tests of various kinds are widely used in the reinforced plastics industry to assess the strength of the reinforcement-to-resin bond in polyester-, vinyl ester-, and epoxy-resin composites. In addition to their importance for the generation of data for research and development, quality control, and specification purposes, such tests are of fundamental value to the fibrous reinforcement industry, since they can be used to determine the potential of new sizing systems for the surface treatment of glass fibers.
5.2 The in-plane shear strength of pultruded cylindrical composites is an important property from an engineering standpoint, since pultruded rod, as such, is used in many structural applications.
SCOPE
1.1 This test method covers the determination of the in-plane shear strength of pultruded, glass-fiber reinforced, thermosetting plastic rod of diameters ranging from 19 to 32 mm (3/4 to 11/4 in.).
1.2 The values stated in SI units are to be regarded as the standard.
1.3 This standard does not purport to address all of the safety concerns, if any, associated with its use. It is the responsibility of the user of this standard to establish appropriate safety and health practices and determine the applicability of regulatory limitations prior to use. Specific precautionary statements are given in Note 2 and Note 3.
Note 1: There is no known ISO equivalent to this standard.
General Information
Relations
Standards Content (Sample)
This international standard was developed in accordance with internationally recognized principles on standardization established in the Decision on Principles for the
Development of International Standards, Guides and Recommendations issued by the World Trade Organization Technical Barriers to Trade (TBT) Committee.
Designation: D3914 − 02 (Reapproved 2016)
Standard Test Method for
In-Plane Shear Strength of Pultruded Glass-Reinforced
Plastic Rod
This standard is issued under the fixed designation D3914; the number immediately following the designation indicates the year of
original adoption or, in the case of revision, the year of last revision.Anumber in parentheses indicates the year of last reapproval.A
superscript epsilon (´) indicates an editorial change since the last revision or reapproval.
1. Scope notched cylindrical specimens of the type shown in Fig. 1.
Loading of the specimen is accomplished with a subpress, or
1.1 This test method covers the determination of the in-
compression tool, such as those shown in Fig. 1 and Fig. 2 of
plane shear strength of pultruded, glass-fiber reinforced, ther-
Test Method D695. Failure of the specimen occurs in shear
mosetting plastic rod of diameters ranging from 19 to 32 mm
between two centrally located notches, diametrically opposed
3 1
( ⁄4 to 1 ⁄4 in.).
and machined halfway through its diameter at a fixed distance
1.2 The values stated in SI units are to be regarded as the
apart. The notches are accurately machined in the specimen
standard.
with maximum reproducibility by means of a special notching
1.3 This standard does not purport to address all of the
jig (Fig. 2a and Fig. 2b) designed specifically for this purpose.
safety concerns, if any, associated with its use. It is the
responsibility of the user of this standard to establish appro- 5. Significance and Use
priate safety and health practices and determine the applica-
5.1 Shear tests of various kinds are widely used in the
bility of regulatory limitations prior to use. Specific precau-
reinforced plastics industry to assess the strength of the
tionary statements are given in Note 2 and Note 3.
reinforcement-to-resin bond in polyester-, vinyl ester-, and
epoxy-resin composites. In addition to their importance for the
NOTE 1—There is no known ISO equivalent to this standard.
generation of data for research and development, quality
2. Referenced Documents
control,andspecificationpurposes,suchtestsareoffundamen-
2.1 ASTM Standards:
tal value to the fibrous reinforcement industry, since they can
D618Practice for Conditioning Plastics for Testing
beusedtodeterminethepotentialofnewsizingsystemsforthe
D695Test Method for Compressive Properties of Rigid
surface treatment of glass fibers.
Plastics
5.2 The in-plane shear strength of pultruded cylindrical
E4Practices for Force Verification of Testing Machines
composites is an important property from an engineering
3. Terminology standpoint, since pultruded rod, as such, is used in many
structural applications.
3.1 Definitions:
3.1.1 in-plane shear strength—the shear strength at maxi-
6. Apparatus
mum load in which the plane of fracture is centrally located
6.1 Testing Machine—Any suitable testing machine capable
along the longitudinal axis of the specimen between two
of control of constant-rate-of-crosshead movement and com-
diametrically opposed notches machined halfway through its
prising essentially the following:
diameter.
6.1.1 Drive Mechanism—A drive mechanism for imparting
4. Summary of Test Method
to the movable member a uniform, controlled velocity with
4.1 In-plane shear strength, as determined by this test respect to the stationary member, as required in 10.3.
method, is measured by applying a compressive load to
6.1.2 Load Indicator—A load-indicating mechanism ca-
pable of showing the total compressive load carried by the test
ThistestmethodisunderthejurisdictionofASTMCommitteeD20onPlastics
specimen. The mechanism shall be essentially free of inertial
and is the direct responsibility of Subcommittee D20.18 on Reinforced Thermoset-
lag at the specified rate of testing and shall indicate the load
ting Plastics.
with an accuracy of 61% of the maximum indicated value of
Current edition approved April 1, 2016. Published April 2016. Originally
the test (load). The accuracy of the testing machine shall be
approved in 1980. Last previous edition approved in 2008 as D3914-02(2008).
DOI: 10.1520/D3914-02R16.
verified at least once a year in accordance with Practices E4.
For referenced ASTM standards, visit the ASTM website, www.astm.org, or
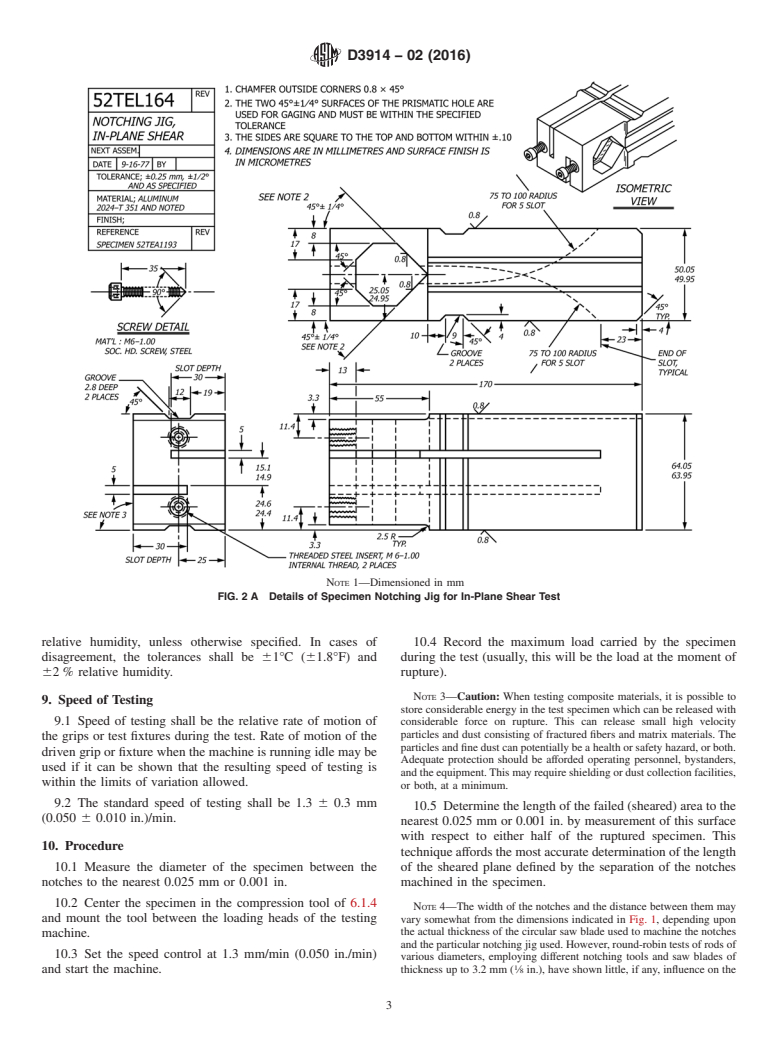
6.1.3 Notching Jig—AnotchingjigofthetypeshowninFig.
contact ASTM Customer Service at service@astm.org. For Annual Book of ASTM
2a and Fig. 2b, or the equivalent, for notching the test
Standards volume information, refer to the standard’s Document Summary page on
the ASTM website. specimens.
Copyright © ASTM International, 100 Barr Harbor Drive, PO Box C700, West Conshohocken, PA 19428-2959. United States
D3914 − 02 (2016)
FIG. 1 Notched Rod In-Plane Shear Specimen; Dimensions: Top, mm; Bottom, in.
6.1.4 Compression Tool—A compression tool for applying pushed along the table to a stop. After machining one notch,
theloadtothetestspecimen,suchasthoseshowninFig.1and turn the tool over and repeat the procedure to provide a second
Fig. 2 of Test Method D695. notch in the specimen diametrically opposed to the first and at
6.1.5 Micrometers—Suitable micrometers, reading to 0.025 a fixed, defined distance (Fig. 1) from it.
mm or 0.001 in., for measuring the diameter of the specimen,
NOTE 2—Caution: When fabricating composite specimens by machin-
as well as the depth of, and distance between, the notches.
ing operations, a fine dust consisting of particles of fibers or the matrix
material,orboth,maybeformed.Thesefinedustscanbeahealthorsafety
7. Test Specimens
hazard, or both.Adequate protection should be afforded operating person-
nel and equipment. This may require adequate ventilation or dust
7.1 Configuration—Test specimens shall be carefully ma-
collecting facilities, or both, at a minimum.
chinedfromtherodsampleofinterestandshallconformtothe
7.3 Number—Aminimum of five specimens shall be tested.
shape and dimensions given in Fig. 1. The ends of the
specimen shall be machined flat and parallel to prevent point
8. Conditioning
loading upon application of the compressive load.
8.1 Conditioning—Condition the test specimens at 23 6
7.2 Preparation—After machining the specimen to proper
2°C(73.4 63.6°F)and50 65%relativehumidityfornotless
length, insert it in the notching jig, flush it with one face of the
than 40h prior to test in accordance with Procedure A of
jig, and tighten the cap screws of the jig to secure it in place.
Practice D618, for those tests where conditioning is required.
Push the assembly (jig and specimen) into a diamond grit
In cases of disagreement, the tolerances shall be 61°C
cutoffwheel(orequivalentblade)aftersettingthebladetogive
(61.8°F) and 62% relative humidity.
theproperdepthofnotch.ThisarrangementisshowninFig.3.
Guidance of the jig durin
...


Questions, Comments and Discussion
Ask us and Technical Secretary will try to provide an answer. You can facilitate discussion about the standard in here.