SIST EN 14587-1:2019
(Main)Railway applications - Infrastructure - Flash butt welding of new rails - Part 1: R220, R260, R260Mn, R320Cr, R350HT, R350LHT, R370CrHT and R400HT grade rails in a fixed plant
Railway applications - Infrastructure - Flash butt welding of new rails - Part 1: R220, R260, R260Mn, R320Cr, R350HT, R350LHT, R370CrHT and R400HT grade rails in a fixed plant
This document specifies requirements for the approval of a welding process in a fixed plant, together with the requirements for subsequent welding production.
It applies to new Vignole railway rails R220, R260, R260Mn, R320Cr, R350HT, R350LHT, R370CrHT and R400HT grade rails of 46 kg/m and above, as contained in EN 13674 1, welded by a flash butt welding process in a fixed plant and intended for use on railway infrastructure.
This document applies to the welding of rails into welded strings.
Bahnanwendungen - Infrastruktur - Abbrennstumpfschweißen von Schienen - Teil 1: Schweißen neuer Schienen der Stahlsorte R220, R260, R260Mn, R320Cr, R350HT, R350LHT, R370CrHT und R400HT in einer stationären Anlage
Dieses Dokument legt die Anforderungen an die Eignung eines Schweißprozesses in einem Schweißwerk fest, zusammen mit den Anforderungen an die anschließende Produktion von Schweißungen.
Die Norm ist anwendbar für neue Vignolschienen der Stahlsorte R220, R260, R260Mn, R320Cr, R350HT, R350LHT, R370CrHT und R400HT mit einer längenbezogenen Masse ab 46 kg/m, wie in EN 13674 1 enthalten, verschweißt durch Abbrennstumpfschweißen in einer stationären Anlage und vorgesehen für die Verwendung in der Eisenbahninfrastruktur.
Dieses Dokument befasst sich mit der Herstellung von Langschienen.
Applications ferroviaires - Voie - Soudage des rails neufs par étincelage - Partie 1 : R220, R260, R260Mn, R320Cr, R350HT, R350LHT, R370CrHT et R400HT dans une installation fixe
Le présent document spécifie les exigences relatives à l’approbation d’un procédé de soudage dans une installation fixe, ainsi que les exigences pour la production de soudures.
Elle s’applique aux rails Vignole neufs de nuances R220, R260, R260Mn, R320Cr, R350HT, R350LHT, R370CrHT et R400HT, de masse est supérieure ou égale à 46 kg/m, contenus dans l’EN 13674-1, soudés au moyen d’un procédé de soudage par étincelage dans une installation fixe et destinés à être utilisés dans des infrastructures ferroviaires.
Le présent document s’applique au soudage de barres longues.
Železniške naprave - Infrastruktura - Elektrouporovno varjenje novih tirnic - 1. del: Varjenje tirnic kakovosti R220, R260, R260Mn, R320Cr, R350HT, R350LHT, R370CrHT in R400HT v varilnici
Ta evropski standard določa zahteve za odobritev postopka varjenja v fiksnem obratu, skupaj z zahtevami za nadaljnjo varilno proizvodnjo.
Uporablja se za nove železniške tirnice Vignole kakovosti R220, R260, R260Mn in R350HT z nosilnostjo 46 kg/m in več, kot je določeno v standardu EN 13674-1, varjene z elektrouporovnim varjenjem v varilnici in namenjene za uporabo na železniški infrastrukturi.
Ta evropski standard se uporablja za varjenje tirnic v varjene sklope.
General Information
- Status
- Published
- Public Enquiry End Date
- 24-May-2017
- Publication Date
- 17-Dec-2018
- Technical Committee
- IŽNP - Reilway applications
- Current Stage
- 6060 - National Implementation/Publication (Adopted Project)
- Start Date
- 12-Dec-2018
- Due Date
- 16-Feb-2019
- Completion Date
- 18-Dec-2018
Relations
- Effective Date
- 11-Dec-2018
- Effective Date
- 21-Dec-2011
Overview
EN 14587-1:2018 (CEN) specifies requirements for the approval and production use of flash butt welding processes carried out in a fixed plant for new Vignole railway rails. It covers welding of rail grades R220, R260, R260Mn, R320Cr, R350HT, R350LHT, R370CrHT and R400HT of 46 kg/m and above (as defined in EN 13674-1) and is intended for the assembly of rails into welded strings for railway infrastructure. This part supersedes EN 14587-1:2007 and forms part 1 of the EN 14587 series.
Key topics and technical requirements
The standard sets out both process-approval and production requirements including:
Welding process requirements
- Rail end preparation and horizontal alignment
- Clamping force, pre-heating, final flashing and upsetting
- Unclamping, slippage control and welding parameter specification
- Post-weld thermal treatment and removal of excess upset
Quality verification and tests for procedure approval
- Visual inspection, magnetic particle or dye-penetrant testing
- Bend tests, macro- and micro-examination, hardness testing
- Fatigue testing and fracture-face defect recording
- Measurement of weld straightness, flatness and steps across the weld
Approval scope and governance
- Procedure approval in a fixed plant, approval of additional rail profiles/grades
- Contractor approval (equipment, operators, supervision)
- Production controls: parameter monitoring, weld identification, finishing and documentation
Practical applications
EN 14587-1:2018 is used to ensure welded rails meet consistent mechanical, metallurgical and geometric quality for safe, long-life track performance. Practical applications include:
- Approving a fixed-plant flash butt welding process before commercial production of welded rail strings
- Defining inspection and test regimes for welding production and acceptance
- Guiding production control, finishing and documentation for welded rails intended for track installation
Who should use this standard
- Railway infrastructure owners and asset managers specifying welded rail quality
- Welding contractors and fixed-plant operators seeking procedure approval
- Rail manufacturers, quality engineers and testing laboratories performing weld qualification
- Track engineers and procurement teams referencing compliant welding processes
Related standards
- EN 13674-1 - Rail grades and dimensions (normative reference)
- EN 14587 series Parts 2 and 3 - mobile welding and welding associated with crossing construction
- Relevant nondestructive testing standards (e.g., EN ISO 3452-1) referenced for inspection methods
This standard is essential for organizations involved in flash butt welding of new rails in fixed plants and for ensuring consistent, traceable weld quality across European railway infrastructure projects.
Frequently Asked Questions
SIST EN 14587-1:2019 is a standard published by the Slovenian Institute for Standardization (SIST). Its full title is "Railway applications - Infrastructure - Flash butt welding of new rails - Part 1: R220, R260, R260Mn, R320Cr, R350HT, R350LHT, R370CrHT and R400HT grade rails in a fixed plant". This standard covers: This document specifies requirements for the approval of a welding process in a fixed plant, together with the requirements for subsequent welding production. It applies to new Vignole railway rails R220, R260, R260Mn, R320Cr, R350HT, R350LHT, R370CrHT and R400HT grade rails of 46 kg/m and above, as contained in EN 13674 1, welded by a flash butt welding process in a fixed plant and intended for use on railway infrastructure. This document applies to the welding of rails into welded strings.
This document specifies requirements for the approval of a welding process in a fixed plant, together with the requirements for subsequent welding production. It applies to new Vignole railway rails R220, R260, R260Mn, R320Cr, R350HT, R350LHT, R370CrHT and R400HT grade rails of 46 kg/m and above, as contained in EN 13674 1, welded by a flash butt welding process in a fixed plant and intended for use on railway infrastructure. This document applies to the welding of rails into welded strings.
SIST EN 14587-1:2019 is classified under the following ICS (International Classification for Standards) categories: 25.160.10 - Welding processes; 45.080 - Rails and railway components; 93.100 - Construction of railways. The ICS classification helps identify the subject area and facilitates finding related standards.
SIST EN 14587-1:2019 has the following relationships with other standards: It is inter standard links to SIST EN 14587-1:2007, SIST EN 14587-1:2007. Understanding these relationships helps ensure you are using the most current and applicable version of the standard.
SIST EN 14587-1:2019 is associated with the following European legislation: EU Directives/Regulations: 2008/57/EC, 93/38/EEC; Standardization Mandates: M/024, M/344, M/483. When a standard is cited in the Official Journal of the European Union, products manufactured in conformity with it benefit from a presumption of conformity with the essential requirements of the corresponding EU directive or regulation.
SIST EN 14587-1:2019 is available in PDF format for immediate download after purchase. The document can be added to your cart and obtained through the secure checkout process. Digital delivery ensures instant access to the complete standard document.
Standards Content (Sample)
2003-01.Slovenski inštitut za standardizacijo. Razmnoževanje celote ali delov tega standarda ni dovoljeno.Železniške naprave - Infrastruktura - Elektrouporovno varjenje novih tirnic - 1. del: Varjenje tirnic kakovosti R220, R260, R260Mn, R320Cr, R350HT, R350LHT, R370CrHT in R400HT v varilniciBahnanwendungen - Infrastruktur - Abbrennstumpfschweißen von Schienen - Teil 1: Schweißen neuer Schienen der Stahlsorte R220, R260, R260Mn, R320Cr, R350HT, R350LHT, R370CrHT und R400HT in einer stationären AnlageApplications ferroviaires - Voie - Soudage des rails neufs par étincelage - Partie 1 : R220, R260, R260Mn, R320Cr, R350HT, R350LHT, R370CrHT et R400HT dans une installation fixeRailway applications - Infrastructure - Flash butt welding of new rails - Part 1: R220, R260, R260Mn, R320Cr, R350HT, R350LHT, R370CrHT and R400HT grade rails in a fixed plant93.100Gradnja železnicConstruction of railways45.080Rails and railway components25.160.10Varilni postopki in varjenjeWelding processesICS:Ta slovenski standard je istoveten z:EN 14587-1:2018SIST EN 14587-1:2019en,fr,de01-februar-2019SIST EN 14587-1:2019SLOVENSKI
STANDARDSIST EN 14587-1:20071DGRPHãþD
EUROPEAN STANDARD NORME EUROPÉENNE EUROPÄISCHE NORM
EN 14587-1
December
t r s z ICS
t wä s x rä s râ
{ uä s r r Supersedes EN
s v w z yæ sã t r r yEnglish Version
Railway applications æ Infrastructure æ Flash butt welding of new rails æ Part
sã R t t rá R t x rá R t x rMná R u t rCrá R u w rHTá R u w rLHTá R u y rCrHT and R v r rHT grade rails in a fixed plant Applications ferroviaires æ Infrastructure æ Soudage des rails neufs par ßtincelage æ Partie
sã Rails de nuances R t t rá R t x rá R t x rMná R u t rCrá R u w rHTá R u w rLHTá R u y rCrHT et R v r rHT dans une installation fixe
Bahnanwendungen æ Infrastruktur æ Abbrennstumpfschweißen von Schienen æ Teil
sã Schweißen neuer Schienen der Stahlsorte R t t rá R t x rá R t x rMná R u t rCrá R u w rHTá R u w rLHTá R u y rCrHT und R v r rHT in einer stationären Anlage This European Standard was approved by CEN on
s y September
t r s zä
egulations which stipulate the conditions for giving this European Standard the status of a national standard without any alterationä Upætoædate lists and bibliographical references concerning such national standards may be obtained on application to the CENæCENELEC Management Centre or to any CEN memberä
translation under the responsibility of a CEN member into its own language and notified to the CENæCENELEC Management Centre has the same status as the official versionsä
CEN members are the national standards bodies of Austriaá Belgiumá Bulgariaá Croatiaá Cyprusá Czech Republicá Denmarká Estoniaá Finlandá Former Yugoslav Republic of Macedoniaá Franceá Germanyá Greeceá Hungaryá Icelandá Irelandá Italyá Latviaá Lithuaniaá Luxembourgá Maltaá Netherlandsá Norwayá Polandá Portugalá Romaniaá Serbiaá Slovakiaá Sloveniaá Spainá Swedená Switzerlandá Turkey and United Kingdomä
EUROPEAN COMMITTEE FOR STANDARDIZATION COMITÉ EUROPÉEN DE NORMALISATION EUROPÄISCHES KOMITEE FÜR NORMUNG
CEN-CENELEC Management Centre:
Rue de la Science 23,
B-1040 Brussels
t r s z CEN All rights of exploitation in any form and by any means reserved worldwide for CEN national Membersä Refä Noä EN
s v w z yæ sã t r s z ESIST EN 14587-1:2019
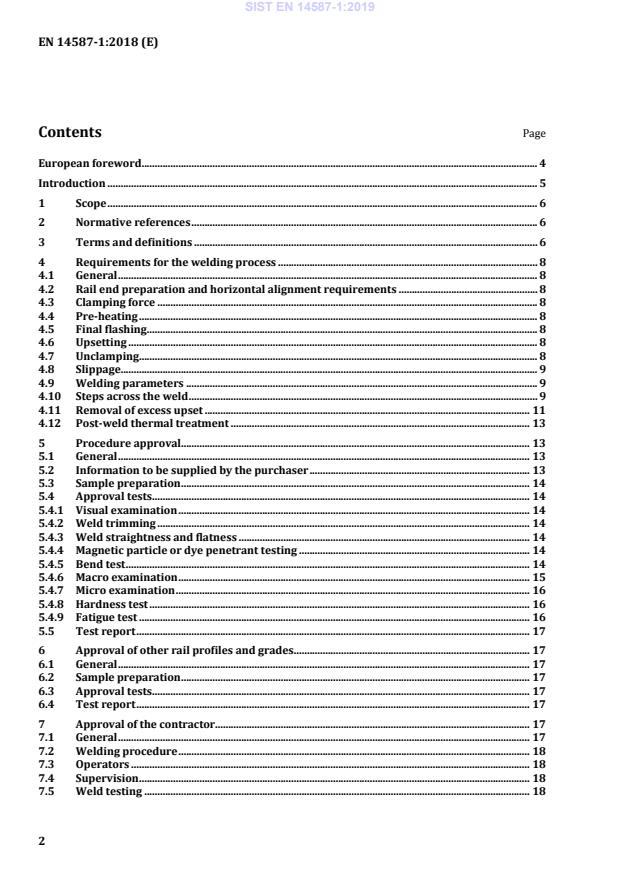
Bend test requirements . 23 Annex B (normative)
Test weld fracture faces – Recording of defects . 25 Annex C (normative)
Fatigue test method for flash butt welds . 27 C.1 General . 27 C.2 Test equipment . 27 C.3 Calibration . 29 C.3.1 General . 29 C.3.2 Test piece . 29 C.4 Fatigue test method . 29 C.4.1 General . 29 C.4.2 Staircase test method . 29 C.4.3 Example of the data analysis of a fatigue strength determination by the staircase method . 32 C.4.4 Past-the-post test method . 32 Annex D (normative)
Macro examination and micro examination . 34 D.1 Macro examination . 34 D.2 Micro examination . 34 Annex E (normative)
Hardness testing . 36 Bibliography . 37
IEC Electropedia: available at http://www.electropedia.org/
ISO Online browsing platform: available at http://www.iso.org/obp
3.1 as-welded condition rails that have been welded and trimmed only 3.2 contractor company approved by a railway authority to provide staff and machinery to execute the production of flash butt welds in a fixed plant, which may include staff and machinery from within the railway authority 3.3 die burn damage caused by localized overheating (arcing) on the surface of the rail due to poor contact between the rail and electrode during welding SIST EN 14587-1:2019
Where the step arises from the rail dimensions the rail foot tips may be dressed locally to achieve this requirement. SIST EN 14587-1:2019
a)
b) Key A running surface B nibbed straight edge C weld upset centreline Z detail view of the step NOTE Step = [x-y] mm. Figure 1 — Measurement of the step with nibbed straight edge SIST EN 14587-1:2019
Figure 2 — Gauge for measuring the step 4.11 Removal of excess upset a) Excess upset should be automatically trimmed. If not possible, the upset shall be removed by grinding. b) Removal of the excess upset shall not cause any mechanical or thermal damage to the rails. c) The surface of the trimmed area shall be free from visible transverse cracking. d) Removal of the excess upset shall be completed in such a manner to keep the joint in compression. e) Any dressing of the weld following the removal of upset shall not cause damage to the rail or weld nor reduce either to a dimension below the original rail profile. f) The maximum thickness of the trimmed upset shall be as set out in Table 2 below and shown in Figure 3. A suggested measurement gauge is shown in Figure 4. Table 2 — Maximum permitted trimmed upset Zone Position of trimmed upset about the weld Maximum permitted upset (in millimetres) A Full head profile from the lower corner on the gauge face to the lower corner on the opposite face 2,5 B The fishing surface on the underside of the head 3,0 C The web, including the top fillet radius and extending down to the start of the bottom fillet radius 2,5 D The foot, including the start of the bottom fillet radii in the web and extending to the foot tips and completely across the underside of the rail foot 2,0 SIST EN 14587-1:2019
Key A zone A – rail head B zone B – on the underside of the rail head C zone C – web of the rail D zone D – foot of the rail Figure 3 — Maximum permitted trimmed upset SIST EN 14587-1:2019
Key A zone A – rail head B zone B – on the underside of the rail head C zone C – web of the rail D zone D – foot of the rail Figure 4 — Gauge for measuring upset 4.12 Post-weld thermal treatment With the exception of R220 and R260 rail grades it may be necessary to conduct a post-weld thermal treatment. This may involve either an accelerated (forced) cooling process or additional heat input. 5 Procedure approval 5.1 General Procedure approval shall be carried out by testing weld samples produced in accordance with this European Standard. Procedure approval testing shall be carried out on the rail profile and grade specified by the purchaser, see 5.2. All test results and weld fracture faces shall be made available for inspection. 5.2 Information to be supplied by the purchaser The following information shall be supplied by the purchaser: a) the rail profile; b) the rail grade; c) the straightness class as in EN 13674-1; d) running edge requirements and identification – left, right or centre alignment; e) alignment class/classes, according to Table 4; f) the type of fatigue test. SIST EN 14587-1:2019
...


Questions, Comments and Discussion
Ask us and Technical Secretary will try to provide an answer. You can facilitate discussion about the standard in here.
Loading comments...